
© Copyright 2020 Homecare Software Solutions, LLC One Court Square 44th Floor Long Island City, NY 11101
Phone: (718) 407-4633 • Fax: (718) 679-9273
Billing Process Guide
Billing Exceptions and Invoicing
The Provider System
© Copyright 2020 Homecare Software Solutions, LLC One Court Square 44th Floor Long Island City, NY 11101
Phone: (718) 407-4633 • Fax: (718) 679-9273
Document Revision History
Date
Description of Revision
01/13/2017 Initial version of the document
11/16/2017 Document updates
11/29/2017 Document updates
11/29/2018 Rebranding
01/31/2019 Add Rebill Functionality
01/03/2020 Add: Preventing Billing Greater than 24 Hours
05/21/2020
Added features:
Entering Revenue and Taxonomy Codes
Payer Restriction on Rebilling Original Claims
View Claim Status Based on 999/277ca
The Provider System
© Copyright 2020 Homecare Software Solutions, LLC One Court Square 44th Floor Long Island City, NY 11101
Phone: (718) 407-4633 • Fax: (718) 679-9273
Table of Contents
Overview ................................................................................................................................. 1
The Billing Process ................................................................................................................... 2
New Invoice Batch .................................................................................................................................... 2
Billing Review ............................................................................................................................................ 4
Service Code Validation Bypass ................................................................................................................ 6
Review Invoice Details .............................................................................................................................. 7
By Batch ................................................................................................................................................ 7
By Invoice .............................................................................................................................................. 8
By Visit ................................................................................................................................................... 9
Exporting Claims .................................................................................................................... 10
File Processing ......................................................................................................................................... 10
Claim Files Tab .................................................................................................................................... 10
Remittances Tab ................................................................................................................................. 11
Rebill Function ....................................................................................................................... 12
Resubmit Claims ...................................................................................................................................... 12
Claim Search ........................................................................................................................................ 12
Selecting Claims .................................................................................................................................. 13
Claim Adjustment .................................................................................................................................... 14
Export and Download ............................................................................................................................. 16
Resubmitted Claim Batch Search ............................................................................................................ 17
Payer Restriction on Rebilling Original Claims ........................................................................................ 19
Claim Adjustment: Submission Type Field .......................................................................................... 20
Preventing Billing Greater Than 24 Hours .............................................................................. 21
Entering Revenue and Taxonomy Codes (as Required by Payer) ............................................ 22
Reference Table Management – Service Code Changes ........................................................................ 23
Billing Review - Revenue and Taxonomy Code Rules ............................................................................. 23
Processing Files - Change Export to Apply Provider Data ....................................................................... 23
View Claim Status Based on 999/277ca ................................................................................. 24
The Provider System
Billing Process Guide Page | 1 Billing Exceptions and Invoicing
Overview Proprietary & Confidential
Overview
This process guide covers the Billing process and functionality at HHAeXchange (HHAX), consisting of:
• Invoicing Visits
• The Billing Review functionality
• Printing/Exporting Claim Files and Remittances
Please direct any questions, thoughts, or concerns regarding the content herein to
HHAeXchange
Customer Support.
HHAX System
Key Terms and
Definitions
The following provides basic definition of HHAX System key terms
applicable throughout the document.
Term
Definition
Member
Refers to the Patient, Consumer, or Recipient. The
Member is the person receiving services.
Caregiver
Refers to the Aide, Homecare Aide, Homecare Worker,
or Worker. The Caregiver is the person providing
services.
Provider
Refers to the Agency or organization coordinating
services.
MCO
Managed Care Organization (MCO) refers to the Payer,
Contract, or HHS. The MCO is the organization placing
Members with Providers.
HHAX
Acronym for HHAeXchange
The Provider System
Billing Process Guide Page | 2 Billing Exceptions and Invoicing
The Billing Process Proprietary & Confidential
The Billing Process
This section covers the process of invoicing Visits and the mechanisms within HHAX that ensures
exported invoices contain accurate billing information and follow all compulsory compliance and
authorization rules set up by each unique MCO.
New Invoice Batch
Once a confirmed Visit clears the Prebilling Review exception page (covered in the Prebilling Process
Guide) it can be Invoiced, or processed and packaged to submit to an MCO. When Visits are invoiced in
HHAX, the system compiles all the selected Visits to be invoiced, at the time of processing, in an Invoice
Batch.
Follow the steps below to invoice a Visit and compile a new invoice Batch.
Step Action
1 Navigate to Billing > New Invoice Batch
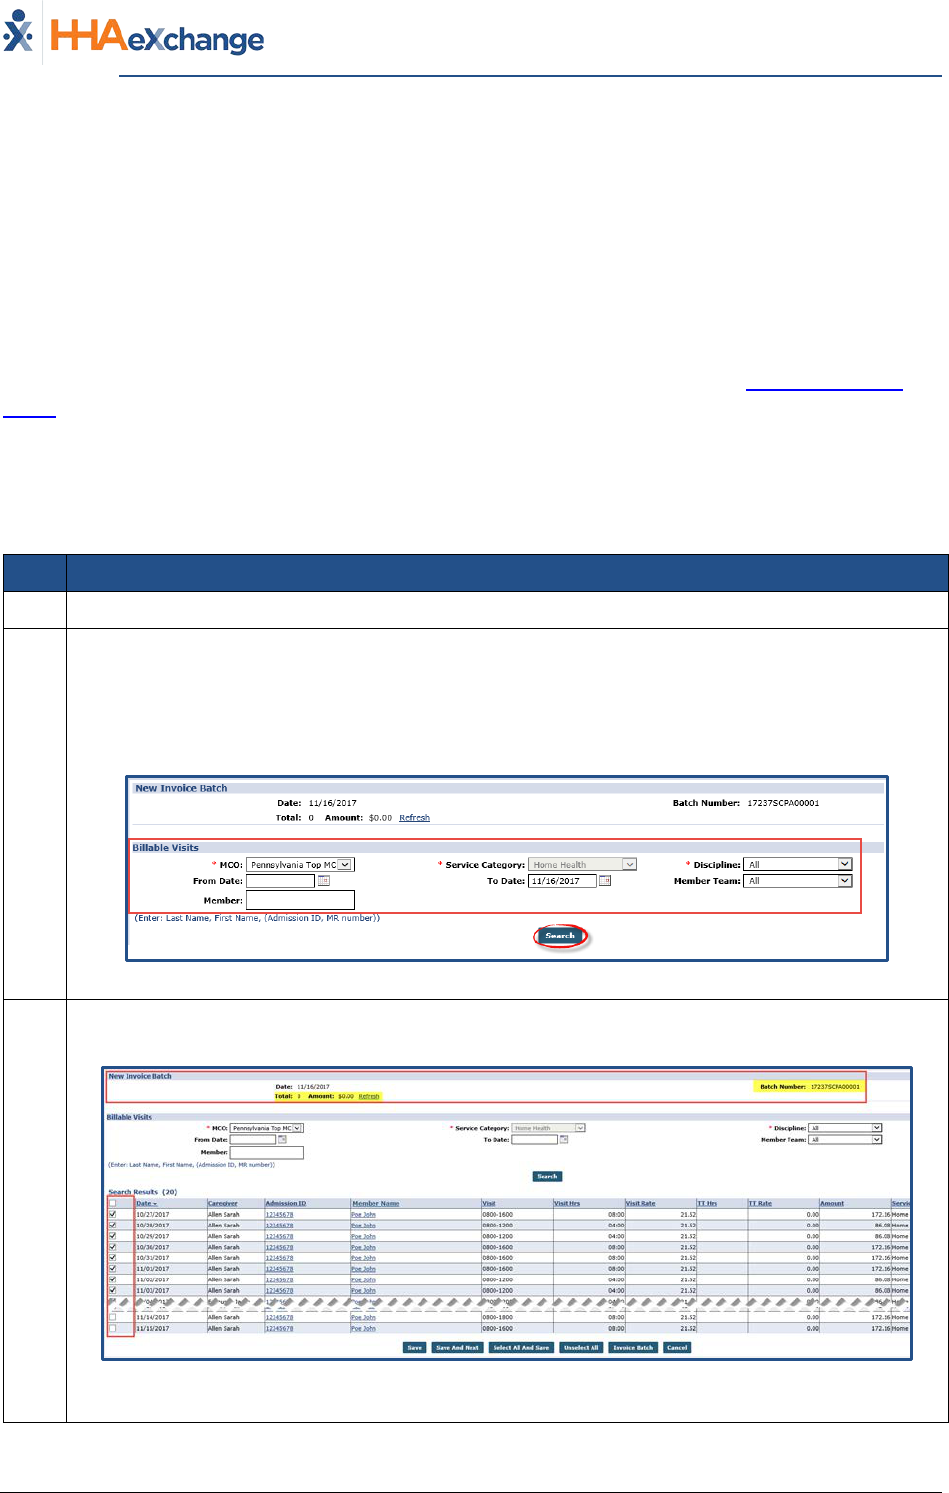
2
Select the applicable MCO from the dropdown options. This populates the Service Category and
Discipline field options accordingly. To search all prior Visits (eligible for invoicing), HHAX
recommends that the From Date field is left blank.
Click the Search button to generate the search.
New Invoice Batch - Search
3
The search results appear. On the left most column, use the available checkbox to select Visits
to be invoiced.
Selected Visits to Invoice
Note: The system tracks the total amount to be billed along with the Batch Number.
Continued on next page

The Provider System
Billing Process Guide Page | 3 Billing Exceptions and Invoicing
The Billing Process Proprietary & Confidential
Step Action
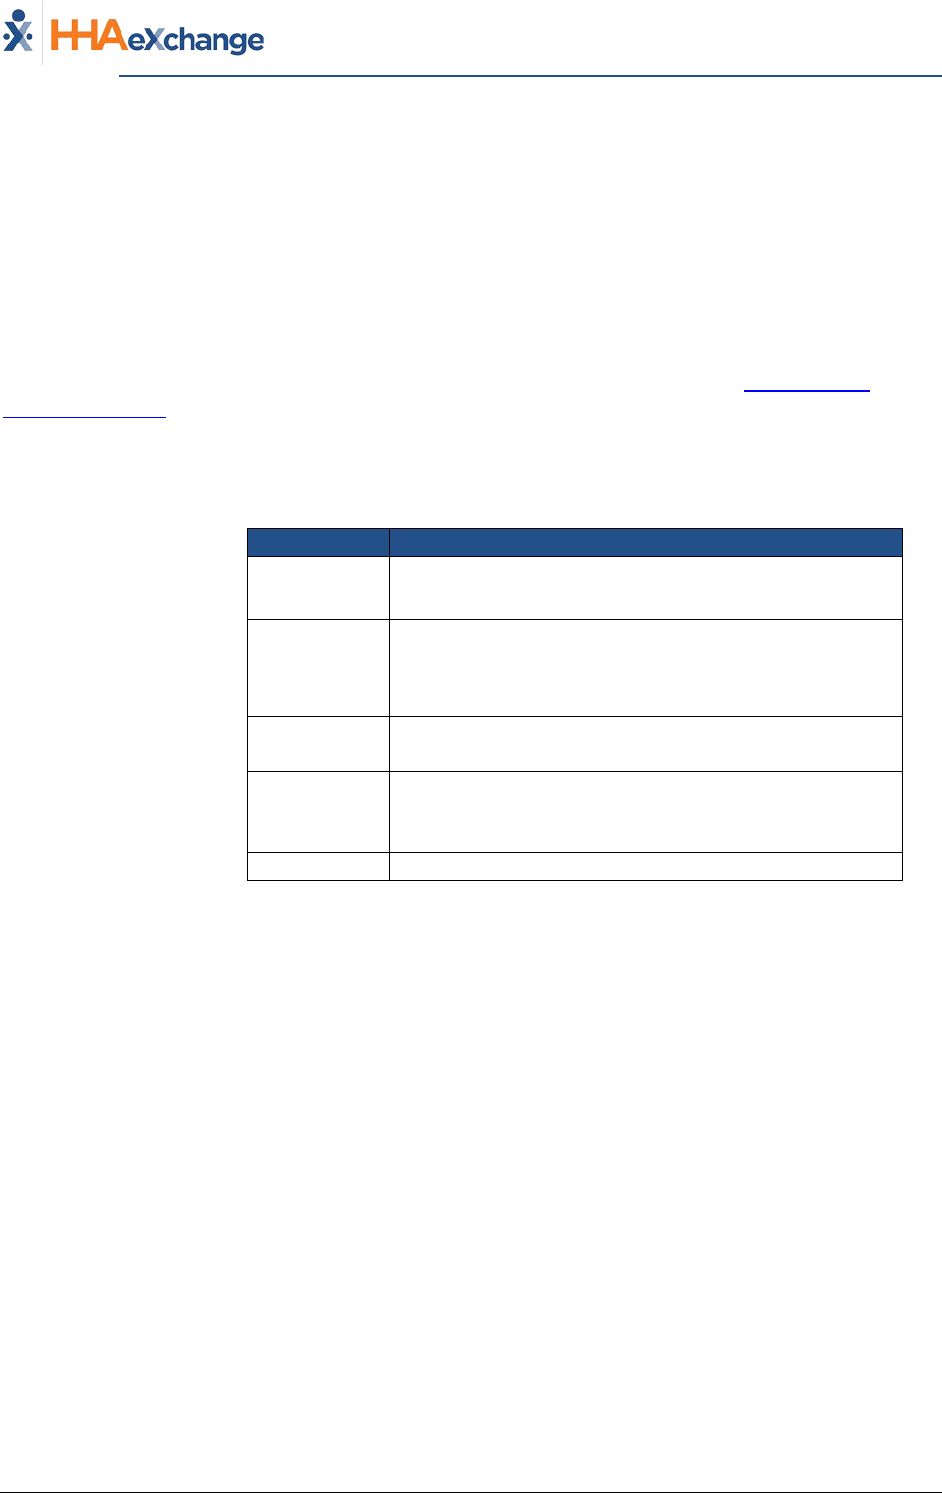
4
Once the visits are selected, there are various options at the bottom of the page as described
in the following table. Select an action button to proceed.
New Invoice Batch – Action buttons
Option
Description
Save
Saves all the selected Visits, but does not invoice them. When
selections are saved, users can navigate to the next page of
search results (if applicable) without losing their selction.
Save & Next
Saves all the selected Visits and loads the next page of search
results (if applicable).
Select All & Save
Saves all Visits on the current page. When selections are saved,
users can navigate to the next page of search results (if
applicable) without losing their selction.
Unselect All
Unselect any selected/saved Visits.
Invoice Batch
Invoice all selected Visits and generate a new Invoice Batch.
Cancel
Cancels entire batch
5
After selecting the Visits to include in the batch (step above), click the Invoice Batch button.
The system generates the batch and provides a confirmation. Click the OK button to continue.
Note: Once invoiced, Visit information cannot be changed.

The Provider System
Billing Process Guide Page | 4 Billing Exceptions and Invoicing
The Billing Process Proprietary & Confidential
Billing Review
The Billing Review page is used to check invoiced visit information against export requirements specific
to each MCO. Invoiced Visits that do not meet the export requirements are held on this page until the
issue is corrected. Complete the steps outlined below to review invoiced Visits held in the Billing Review
page.
Step Action
1 Navigate to Billing > Billing Review
2
Search to view all invoiced Visits held in Billing Review. Click the Search button for all held Visits
or specify search criteria using the available filters (such as MCO, Hold Reason, and Invoice
To/From date ranges).
Billing Review Search Filters
3
The results (summary) are generated beneath the search fields and filters. By default, the
system sorts by MCO. As illustrated, this summary provides a breakdown of the number of
Visits on hold by type (Hourly, Daily, and Visit) as well as the Total Amount on Hold (total dollar
amount on hold).
The value under the Total Visits column is a link which loads a new screen displaying the search
results in a detailed view. Click the number (link) to proceed (in this case, “9”).
Billing Review, Summary View
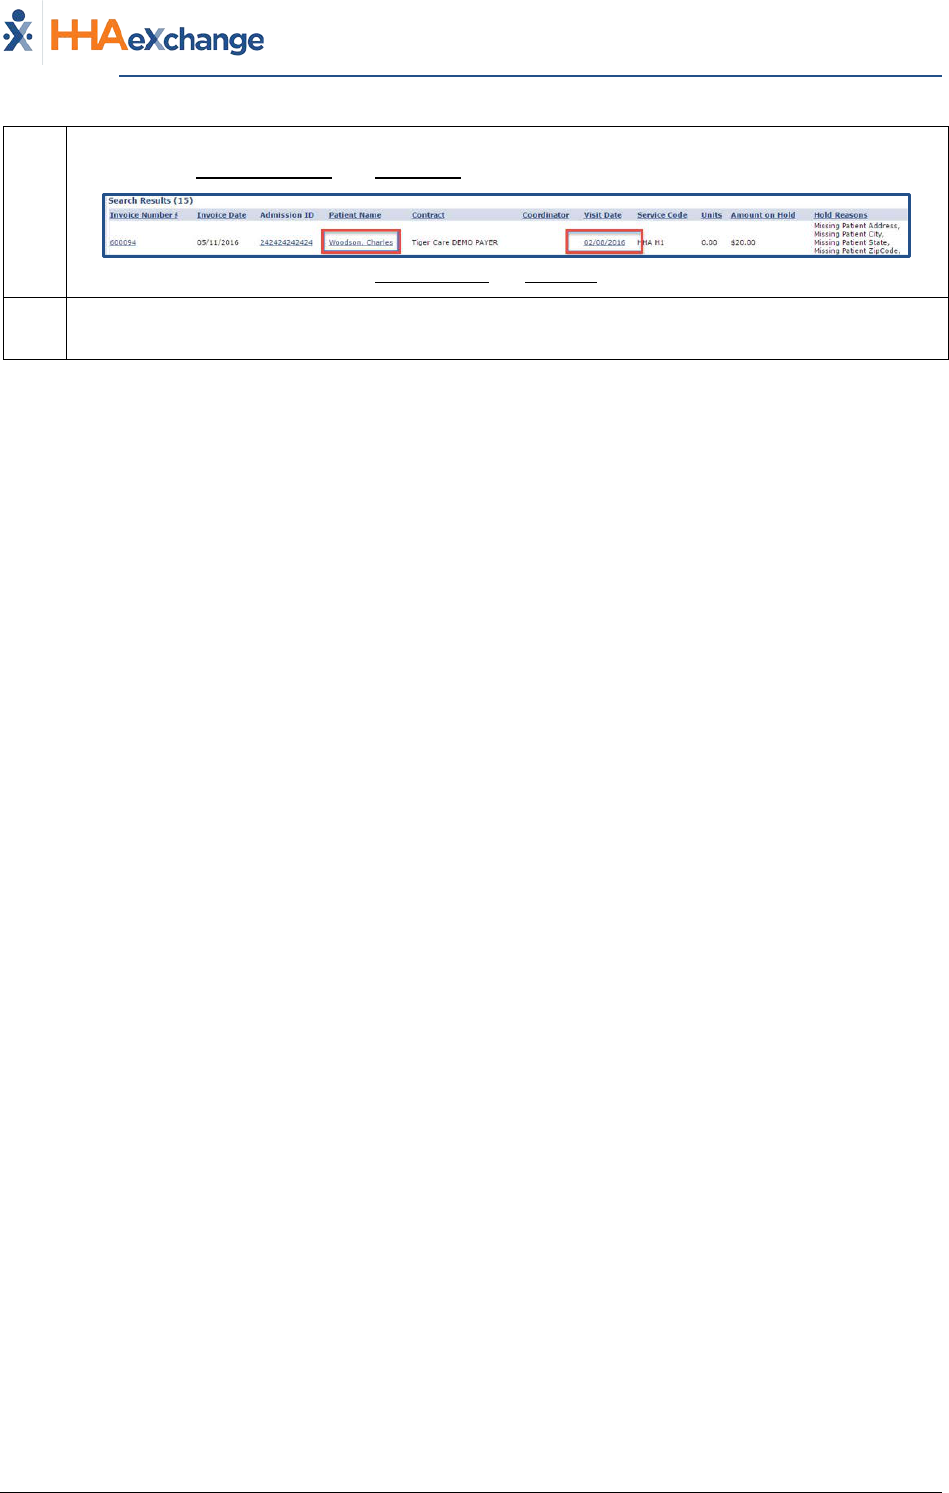
4
The Detailed View window displays the Hold Reasons per Visit.
Billing Review, Detailed View
Continued on next page
Step Action
The Provider System
Billing Process Guide Page | 5 Billing Exceptions and Invoicing
The Billing Process Proprietary & Confidential
5
To resolve Hold Reasons, navigate directly to the Member Profile and the Visit Window by
selecting the Member Name and Visit Date links for the corresponding Visit, respectively.
Member Name and Visit Date Links
6
When the Hold Reason is resolved, the system automatically releases the Visit from the Billing
Review page.
The Provider System
Billing Process Guide Page | 6 Billing Exceptions and Invoicing
The Billing Process Proprietary & Confidential
Service Code Validation Bypass
Some Service Codes are set up to bypass Prebilling and/or Billing Review validations; typically used for
non-billable Visits. Therefore, Visits scheduled with these types of Service Codes can be invoiced
without fulfilling MCO-specified requirements.
Service Codes set up to bypass Prebilling are still held for violating the following validations:
• Incomplete Confirmation
• With TEMP Caregiver
• OT/TT Not Approved
• Restricted Caregiver
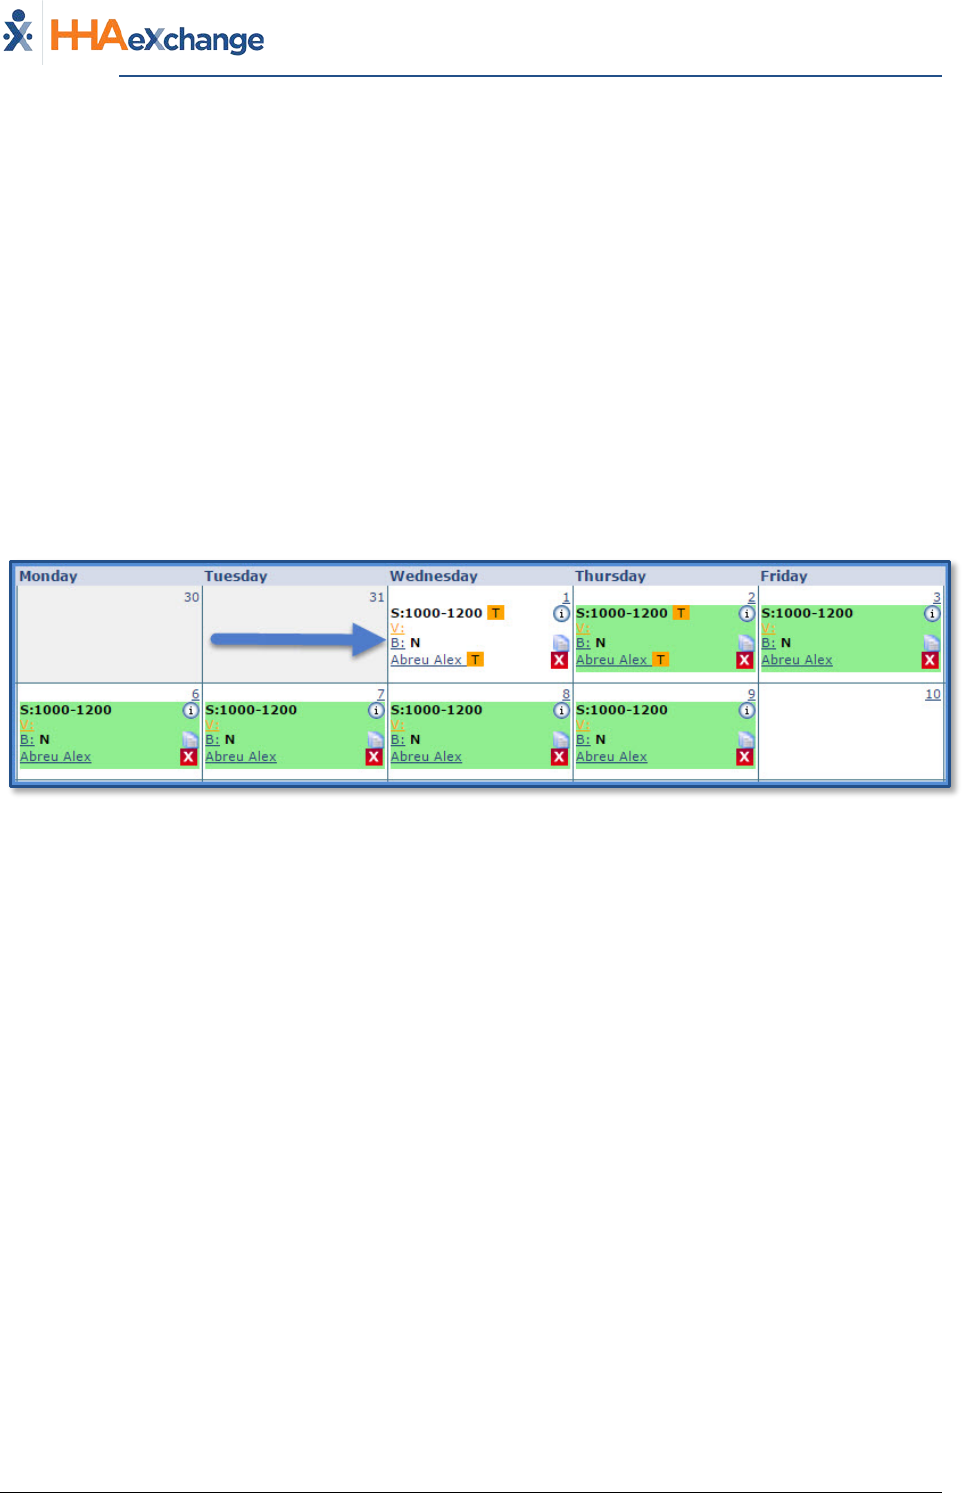
On the Member Calendar page, any Visit scheduled with a Service Code setup to ignore Prebilling
validations display in white to indicate that it is not governed by any Authorizations:
Visit Scheduled with “Bypass Prebilling Validation” Service Code
The Provider System
Billing Process Guide Page | 7 Billing Exceptions and Invoicing
The Billing Process Proprietary & Confidential
Review Invoice Details
Reviewing processed invoices, specifically those with a Pending Status (not yet exported from HHAX)
allows Providers another opportunity to identify clerical errors that could be missed by the Prebilling
Review or Billing Review exception pages.
Follow the steps outlined below to review the details of processed invoices By Batch, By Invoice and By
Visit (as described in the following tables per option).
By Batch
Step Action
1 Navigate to Billing > Invoice Search > By Batch
2 Search for the batch using the available filters. Click the Search button.
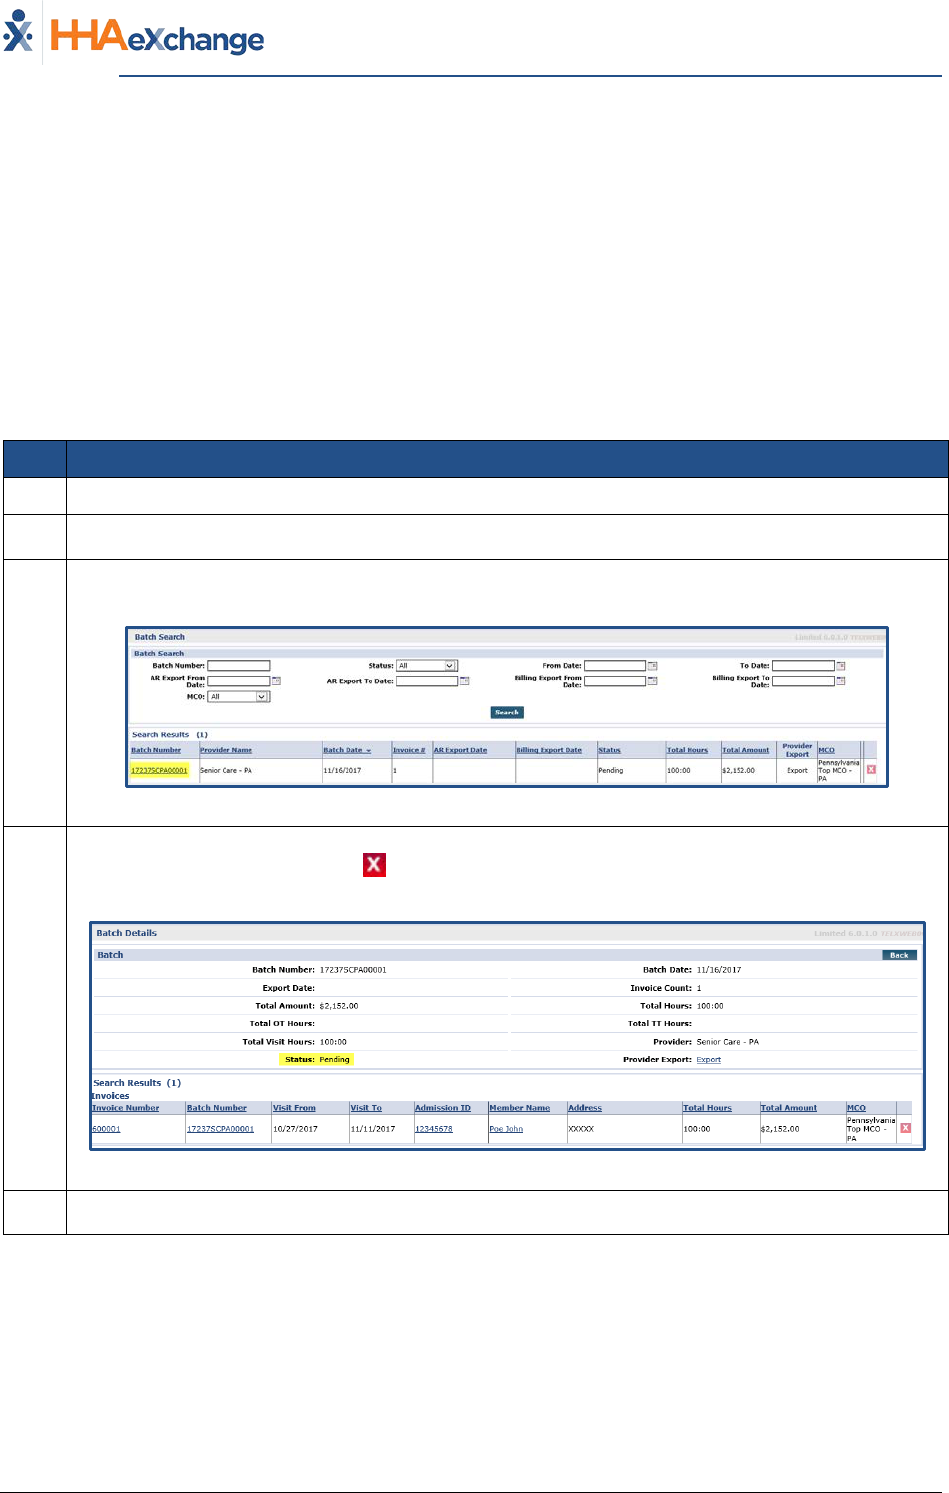
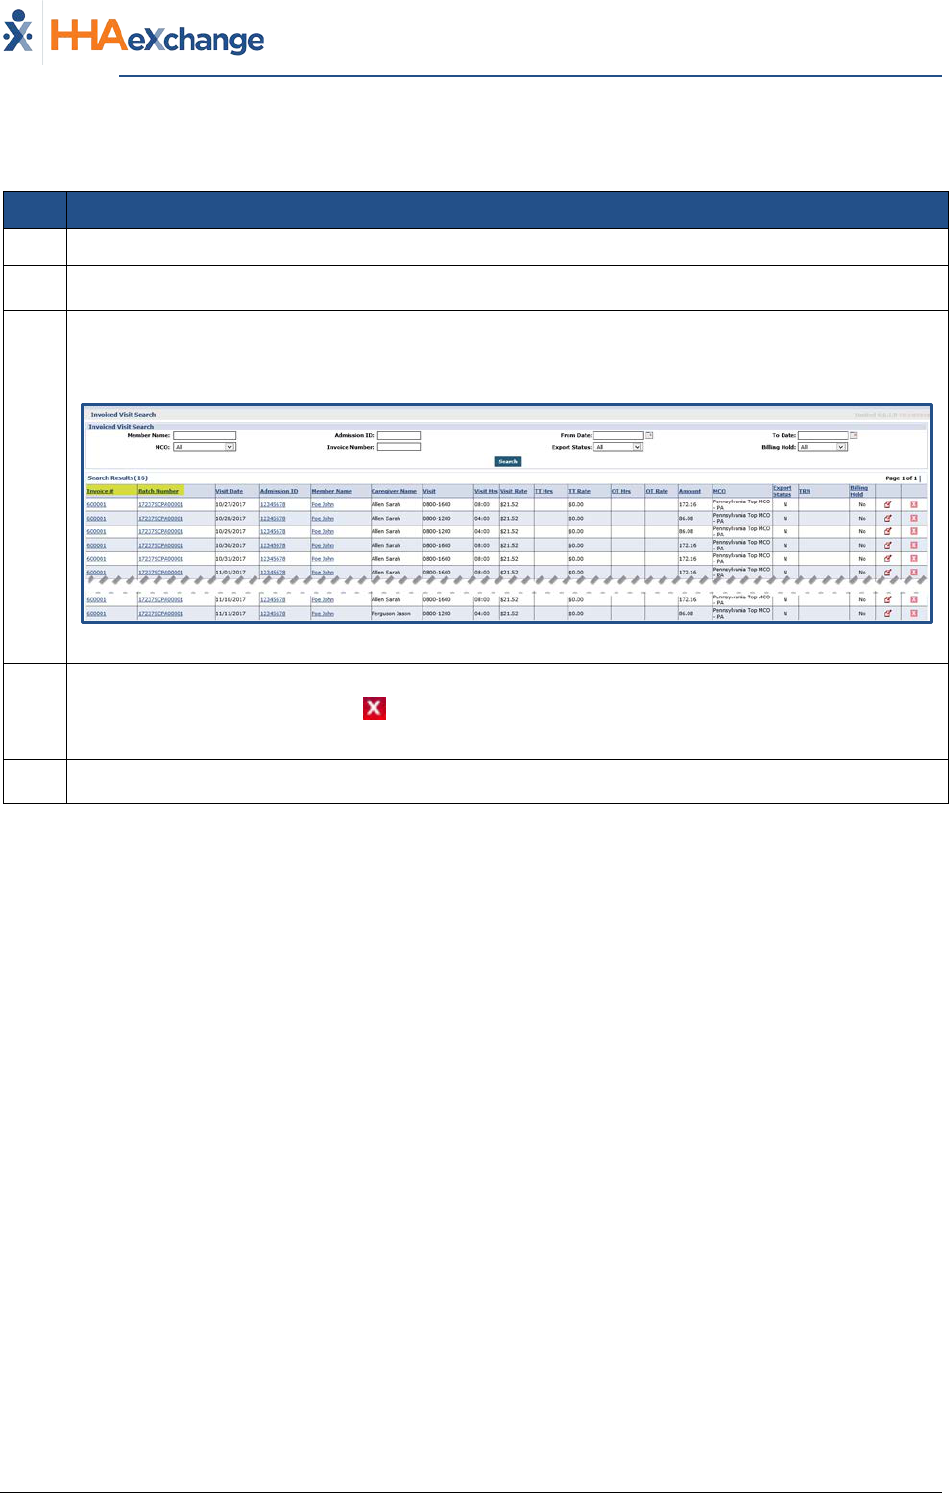
3
The results generate invoice batches accordingly. Locate the batch and click on the Batch
Number (link) to review the individual invoices within a batch.
Search by Batch
4
Review the details. A Visit may be removed from an invoice (with a Pending Status) if an error is
discovered by using the delete “ ” icon. Visit information cannot be edited, or removed, once
an invoice has been exported (with a Billed Status).
Invoices within a Batch
5 Click the Back button to navigate back to the search results page.
The Provider System
Billing Process Guide Page | 8 Billing Exceptions and Invoicing
The Billing Process Proprietary & Confidential
By Invoice
Step Action
1 Navigate to Billing > Invoice Search > By Invoice
2 Search for the invoice using the available filters. Click the Search button.
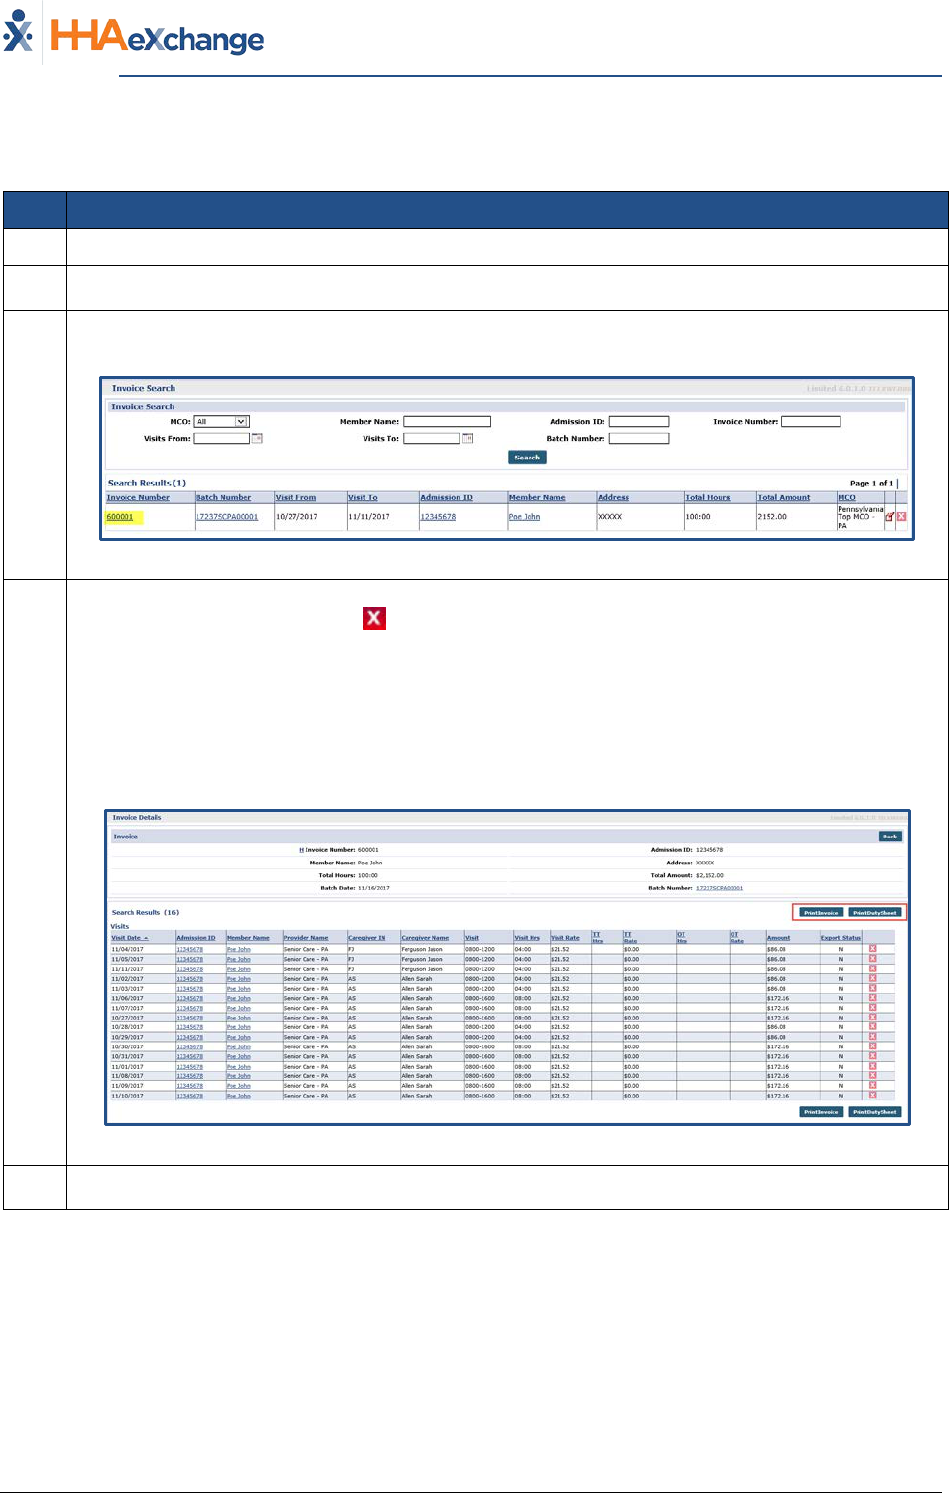
3
The results generate invoices accordingly. Locate the invoice and click on the Invoice Number
(link) to review the individual invoice details.
Search by Invoice
4
Review the details. A Visit may be removed from an invoice (with a Pending Status) if an error is
discovered by using the delete “ ” icon. Visit information cannot be edited, or removed, once
an invoice has been exported (with a Billed Status).
Click the Print Invoice button to print the invoice.
Click Print Duty Sheet button to print the Duty Sheet associated with the invoice (if/as
applicable).
Visits within an Invoice
5 Click the Back button to navigate back to the search results page.
The Provider System
Billing Process Guide Page | 9 Billing Exceptions and Invoicing
The Billing Process Proprietary & Confidential
By Visit
Step Action
1 Navigate to Billing > Invoice Search > By Visit
2 Search for the visit using the available filters. Click the Search button.
3
The results generate invoiced visits accordingly. Locate the visit and click on the Invoice Number
(link) to review the invoice the Visit was included in, or the link in the Batch Number column to
review the batch the Visit was included in.
Search by Visit
4
Review the details. A Visit may be removed from an invoice (with a Pending Status) if an error is
discovered by using the delete “ ” icon. Visit information cannot be edited, or removed, once
an invoice has been exported (with a Billed Status).
5 Click the Back button to navigate back to the search results page.

The Provider System
Billing Process Guide Page | 10 Billing Exceptions and Invoicing
Exporting Claims Proprietary & Confidential
Exporting Claims
For some Providers, the Billing process is complete once an invoice is processed and clears the Billing
Review exception page. In such cases, HHAX automatically compiles all invoiced Visits for the day and
exports them overnight.
Other markets require Providers to manually download the invoices (or the 837 Claim File) and export it
to a designated Clearinghouse (specified by the authorizing MCO).
This section applies to those Providers required to manage claim exports manually.
File Processing
The File Processing page is divided into two tabs, Claim Files and Remittances. The File Processing Page
enables the user to follow the 837 Claim Files (on the Claim Files Tab) and follow remittances sent back
from the MCO (on the Remittance Tab). The Claim Files tab allows users to search and export 837 Claim
Files, while the Remittances tab is used to review 835 Remittance Files sent back by the Clearinghouse.
Claim Files Tab
For Providers who are required to manually review and export 837 Claim Files type, the file must be
exported from HHAX to the user’s local drive. Follow the steps outlined below to download 837 Claim
Files.
Step Action
1 Navigate to Admin > File Processing > Claim Files
2
Click the Search button to review all generated claim files yet to be exported or select search
filters to narrow the search results.
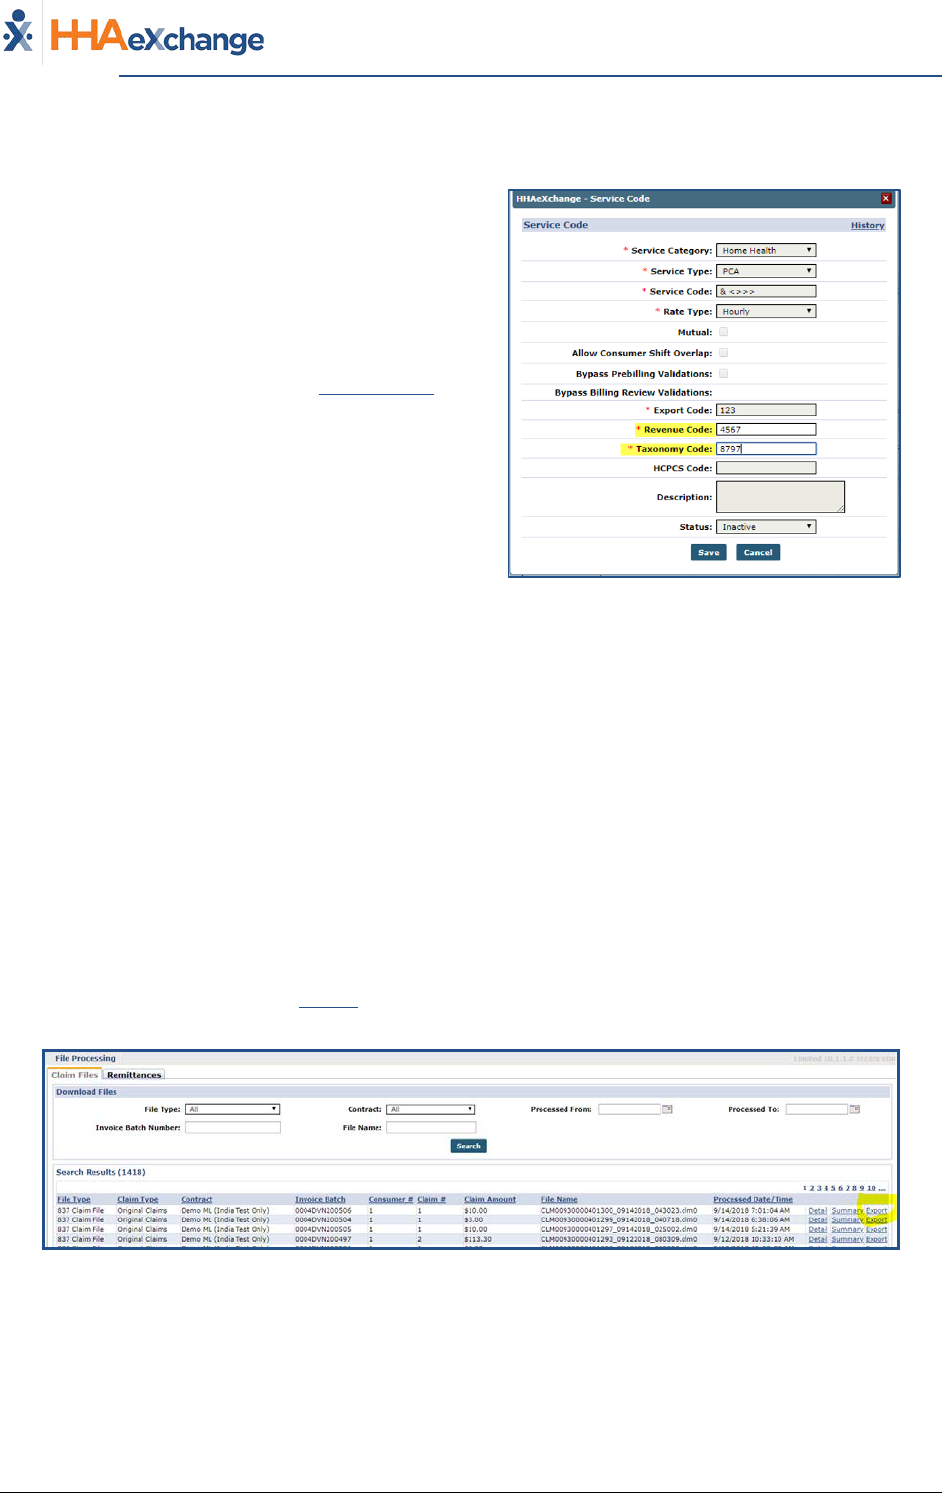
3 In the results, click the Export link in the right most column.
4
A notification appears in-browser, prompting the user to open or save the 837 Claim File.
Claim Files Tab
5 Save the file to the desired location.
6 Upload the claim file to the designated Clearinghouse.
The Provider System
Billing Process Guide Page | 11 Billing Exceptions and Invoicing
Exporting Claims Proprietary & Confidential
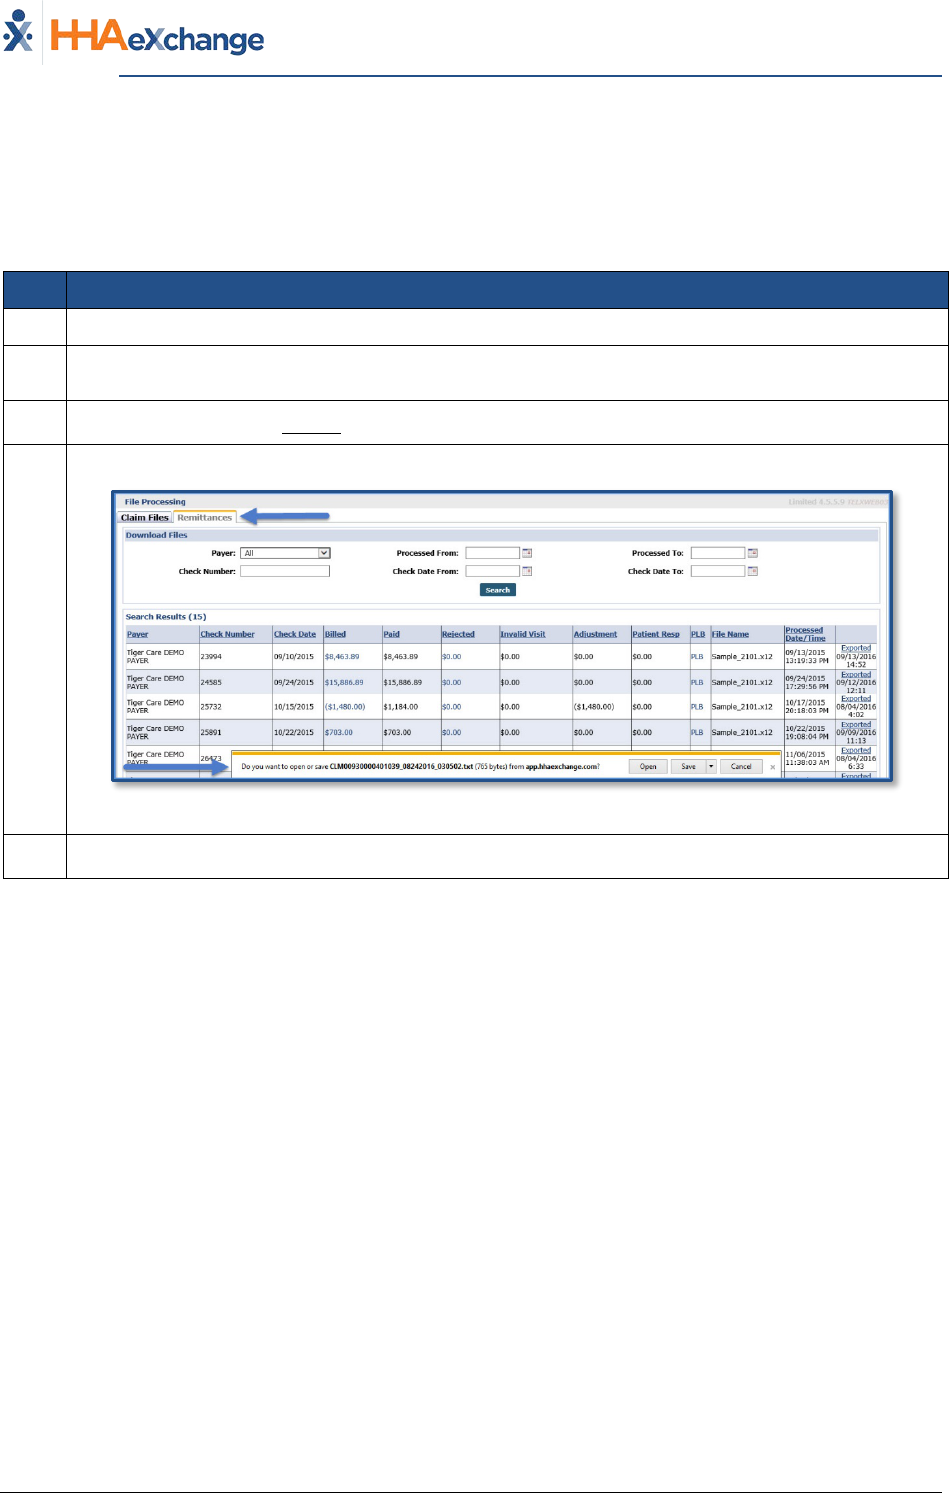
Remittances Tab
The Remittances tab maintains a record of all 835 Remittance Files that have been sent back from
Clearinghouses. The files may be exported from the Remittances tab and processed in an external
application. Follow the steps outlined below to download 835 Remittance Files.
Step Action
1 Navigate to Admin > File Processing > Remittances
2
Click the Search button to review all remittance files or select search filters to narrow the search
results.
3 In the results, click the Export link in the right most column.
4
A notification appears in-browser, prompting the user to open or save the 835 Remittance File.
Remittances Tab
5 Save the file to the desired location.
The Provider System
Billing Process Guide Page | 12 Billing Exceptions and Invoicing
Rebill Function Proprietary & Confidential
Rebill Function
Payers must have this feature activated by HHAX System Administration to allow
Providers to perform rebilling functions. Please contact HHAX Customer Support for
further details.
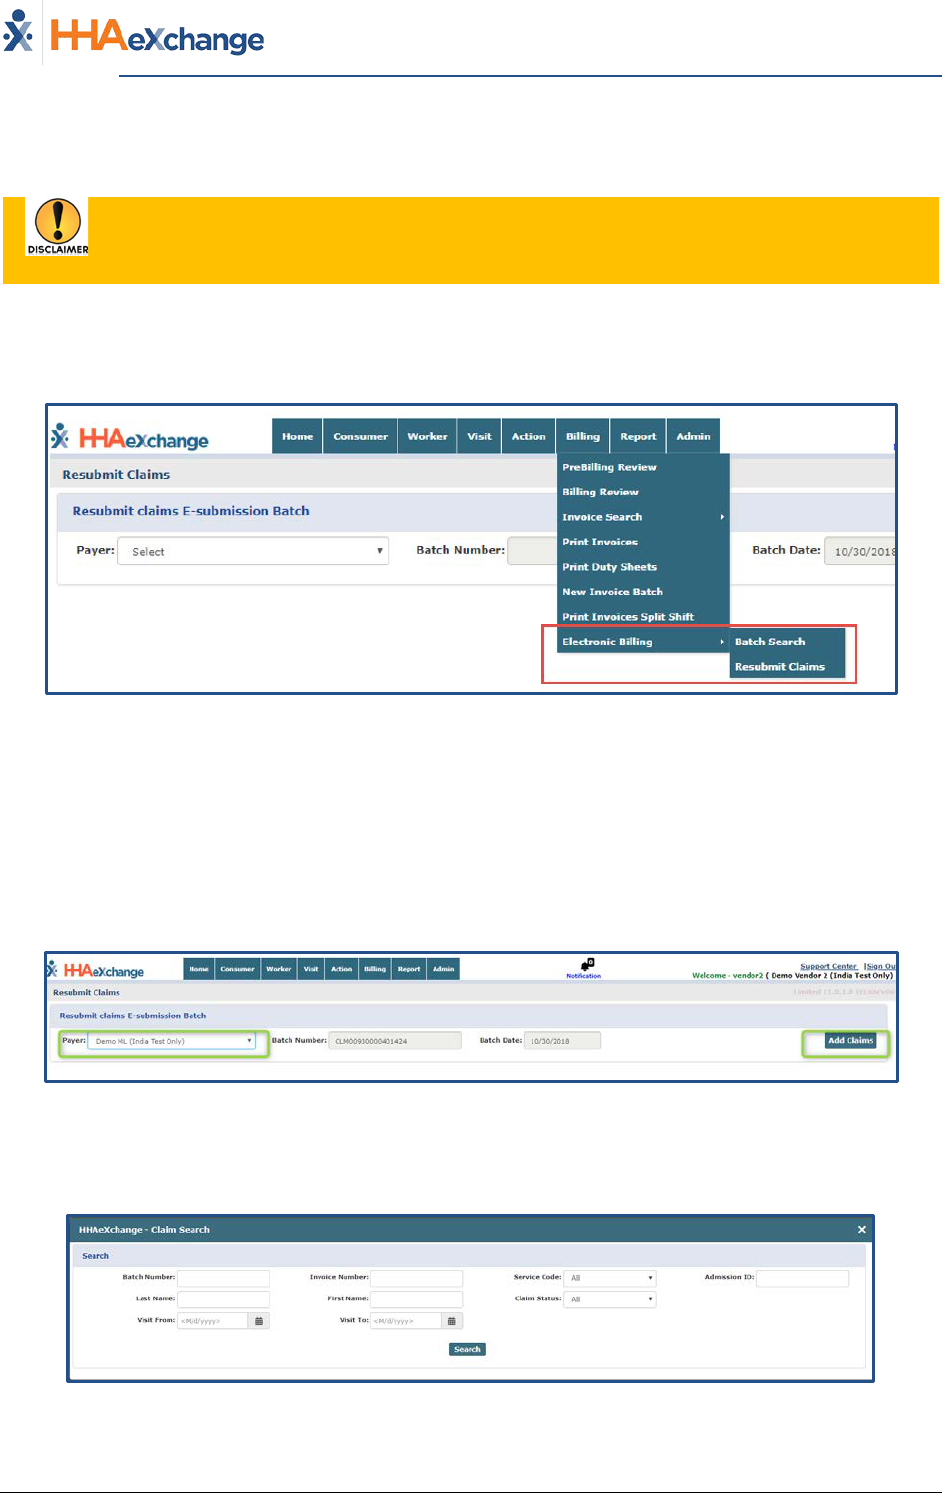
Providers can rebill a claim without having to submit a request to the HHAX Support Team. The two
menu items to support this feature are located under the Billing tab (Billing > Electronic Billing) to
include Resubmit Claims and Batch Search, as seen in the images below.
Billing > Electronic Billing (Batch Search and Resubmit Claims)
Resubmit Claims
Claim Search
On the Resubmit Claims screen, select the Payer from the Payer field (required) to generate a new Batch
Number (Payers appear based on e-billing configuration). Once both fields are selected the Add Claims
button is enabled. Click the Add Claims button to open the Claims Search page.
Resubmit Claims – Add Claims
On the Claim Search screen, use the search filters to locate the claim. Searches can be generated by
Batch Number, Invoice Number, and Claim Status as well as Visit dates and Patient Name.
Claim Search Window
The Provider System
Billing Process Guide Page | 13 Billing Exceptions and Invoicing
Rebill Function Proprietary & Confidential
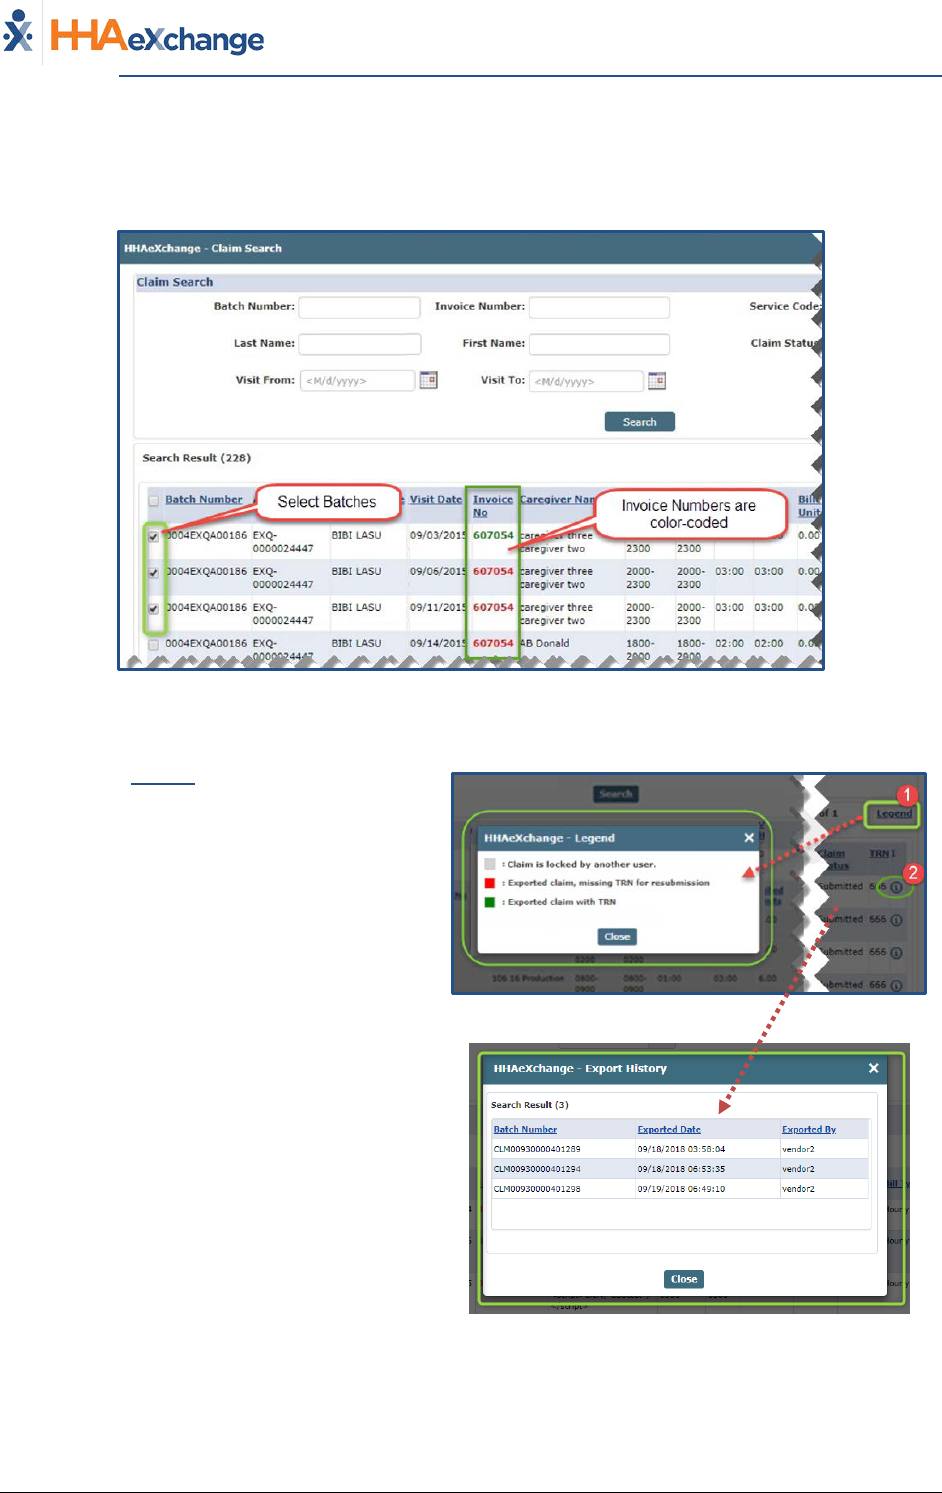
Selecting Claims
From the search results, batch numbers can be selected using the checkboxes on the left-most column.
Invoice Numbers are color-coded as a visual aid.
Claim Search Results
Note: If search criteria is changed, a warning window alerts the user that the previous selection will be lost.
1) Click the Legend link (to the right of the
screen) to open/view the Legend pop-up
window indicating what the various colors
define (as seen in the image).
Claim Search Legend
2) Click the (i) icon to view the Export history
for the record.
Export History
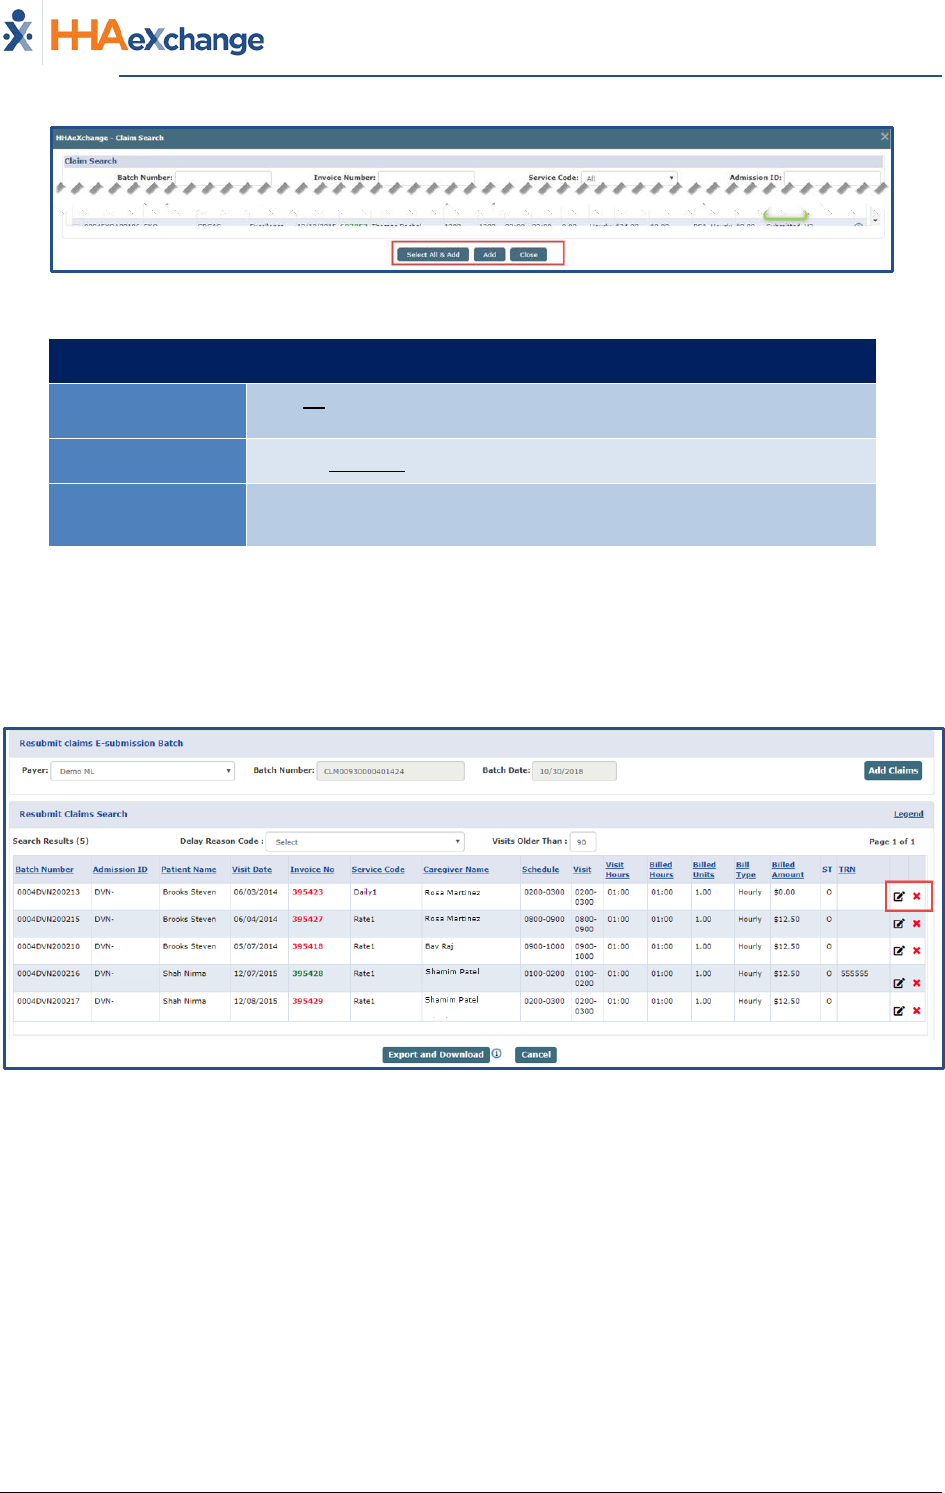
The bottom of the search results page offers three action buttons: Select All & Add, Add, and Close
(pictured below), as described in the table below.
The Provider System
Billing Process Guide Page | 14 Billing Exceptions and Invoicing
Rebill Function Proprietary & Confidential
Action Buttons
Select… To…
Select All & Add
Save all records displayed on the page and include in the resubmit
claim page.
Add Save all selected records and include in the resubmit claim page.
Close
Close claim search popup and route back to the resubmit claim
page.
Claim Adjustment
Selected claims appear on the Resubmit Claims page (pictured below), where Providers can edit or
delete a record (from the Claim to be resubmitted). Click the Pencil icon to access the Claim Adjustment
screen. Click the red “X” icon to remove an individual record from the claim resubmission.
Resubmit Claims E-Submission Batch Screen
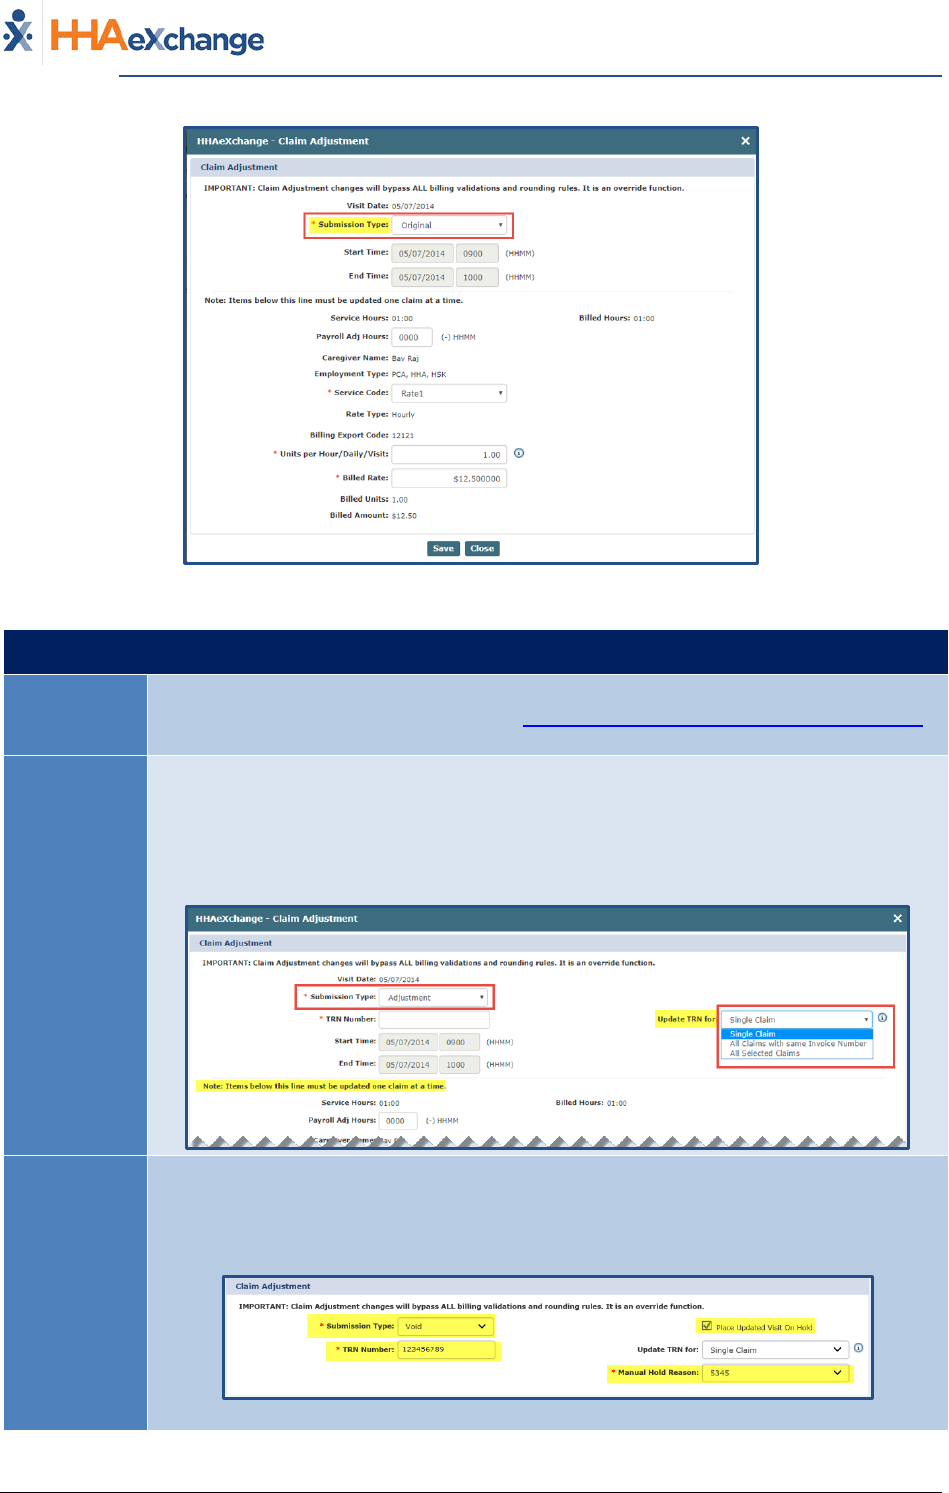
On the Claim Adjustment screen, the Submission Type field is required (as denoted with a red asterisk).
There are three Submission Types: Original, Adjustment, and Void, described in the table below the
image.
The Provider System
Billing Process Guide Page | 15 Billing Exceptions and Invoicing
Rebill Function Proprietary & Confidential
Claim Adjustment Window (with Original Submission Type)
Select… To…
Original
Default option; used if the Provider does not edit the Submission Type. A Payer may
restrict this Rebilling option; refer to the Payer Restriction on Rebilling Original Claims
section for details.
Adjustment
The TRN Number and Update TRN for fields populate if Adjustment is selected.
• For the TRN Number, indicate if this adjustment is for a Single Claim, All Claims
with same Invoice Number, or All Selected Claims.
• Items such as Service Code, Pay Code, Rates, and Hours which appear below
the line can only be adjusted as a Single Claim.
Void
When selecting Void, the Place Updated Visit on Hold checkbox is automatically
selected and un-editable. The TRN Number and Manual Hold Reason fields are
required. Select the applicable Update TRN for option (Single Claim, All Claims with
same Invoice Number, or All Selected Claims).
Note: Selecting Void hides other adjustment information fields on the window.
The Provider System
Billing Process Guide Page | 16 Billing Exceptions and Invoicing
Rebill Function Proprietary & Confidential
Upon adjusting, click Save to update the selected record(s). Based on the selected Submission Type,
respective TRN Number, and Update TRN for to the claim, selected records are updated accordingly.
• If Single Claim is selected (from the Update TRN for field), then only the current record for the
selected Submission Type and TRN Number is updated. If Void is selected, then the Visit is
placed on hold according to the chosen Manual Hold Reason.
• If the All Claims with same invoice number is selected (from the Update TRN for field), then all
matching records with the same Invoice Number are updated according to the chosen
Submission Type and TRN Number. If Void is selected, then all records within the same Invoice
Number are placed on hold according to the selected Manual Hold Reason.
• If All Selected Claims is selected, then all records are updated with chosen Submission Type and
TRN Number. If Void is selected, then all corresponding Visits are placed on hold according to
the selected Manual Hold Reason.
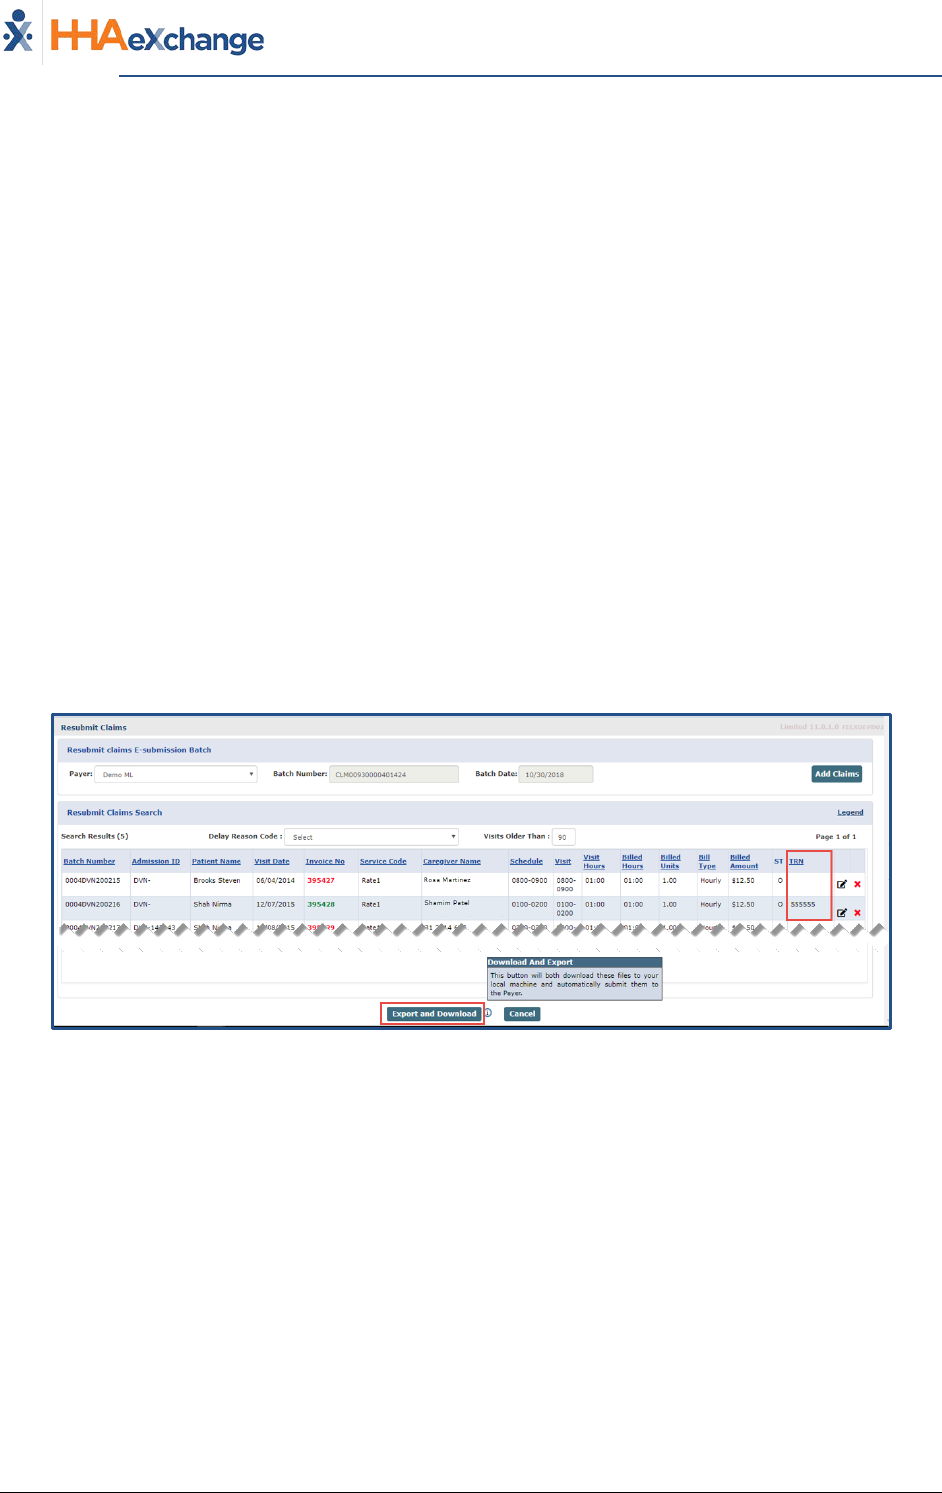
Export and Download
Click the Export and Download button to generate a Resubmitted Claim. The system generates an 837
which is exported to the Payer and the user has the option to download the file to their local
workstation. Once complete, the system routes back to the Batch Search page.
Export and Download
The system checks if the below-listed fields are updated/changed on the adjustment screen. When
processing Adjustments, the system updates invoice detail information with changed fields.
1. Payroll Adj Hours
2. Service Code
3. Unit per Hours/Daily/Visit
The Provider System
Billing Process Guide Page | 17 Billing Exceptions and Invoicing
Rebill Function Proprietary & Confidential
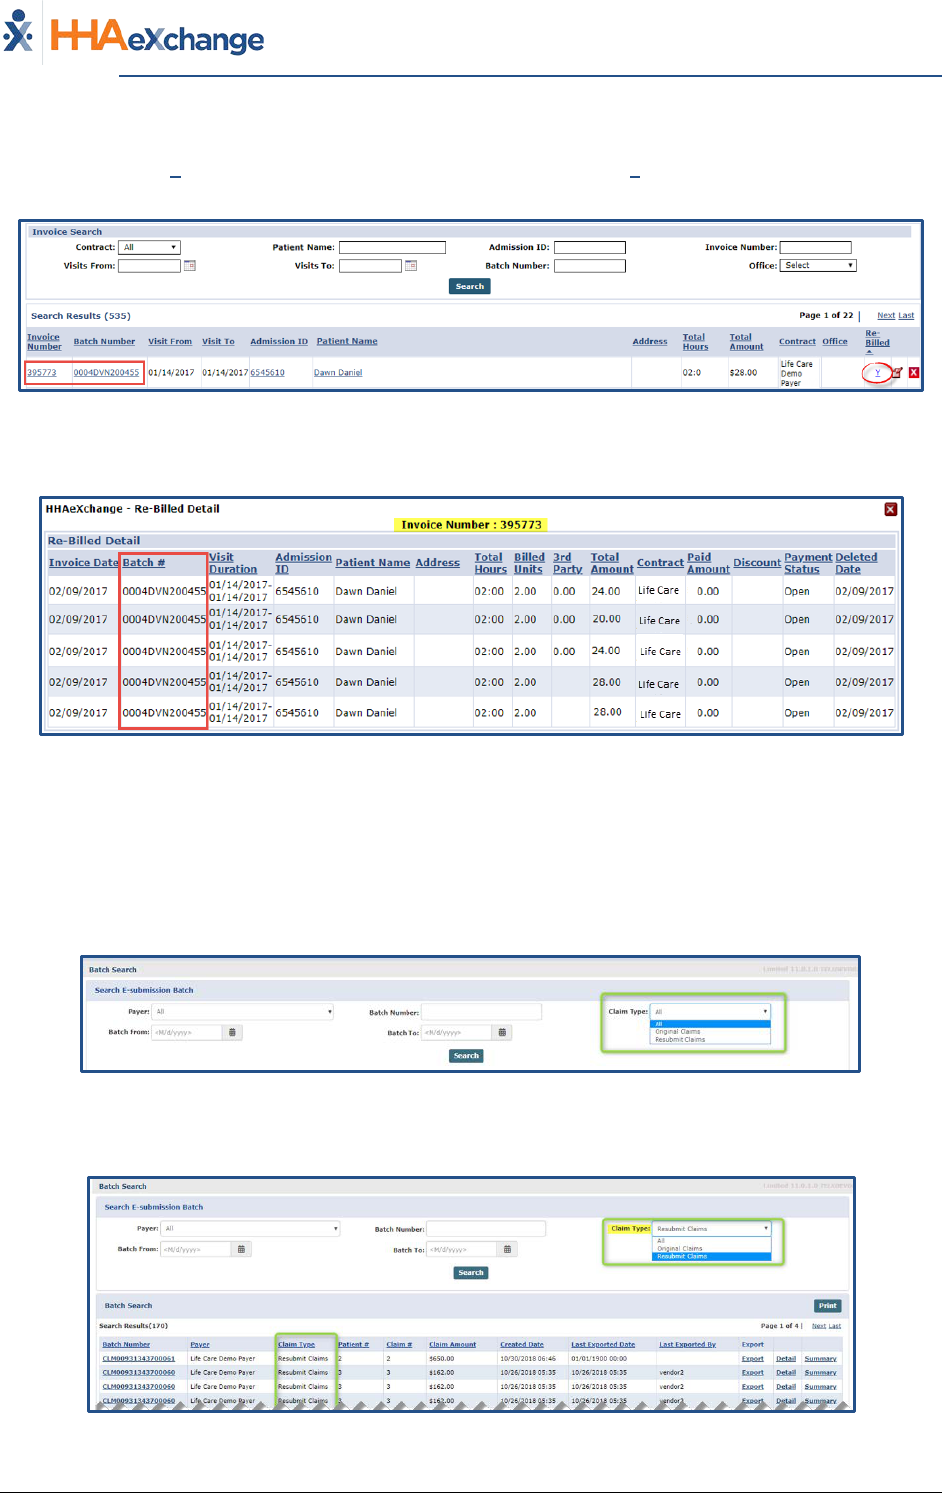
The image below illustrates search results by Invoice (Billing > Invoice Search > By Invoice). Once a
Claim is rebilled, a Y link appears under the Rebilled column. Click the Y link to view the rebilling history
for the Invoice.
View Invoice Details
The Re-Billed Details pop-up opens providing Invoice details.
Rebilled Details Window
Resubmitted Claim Batch Search
Providers can search for exported claims, by navigating to Billing > Electronic Billing > Batch Search. The
Payer and Claim Type fields are preselected to All (by default). To narrow searches, select the applicable
Payer(s) and Claim Type(s) as well as a date range.
Batch Search Claim Types
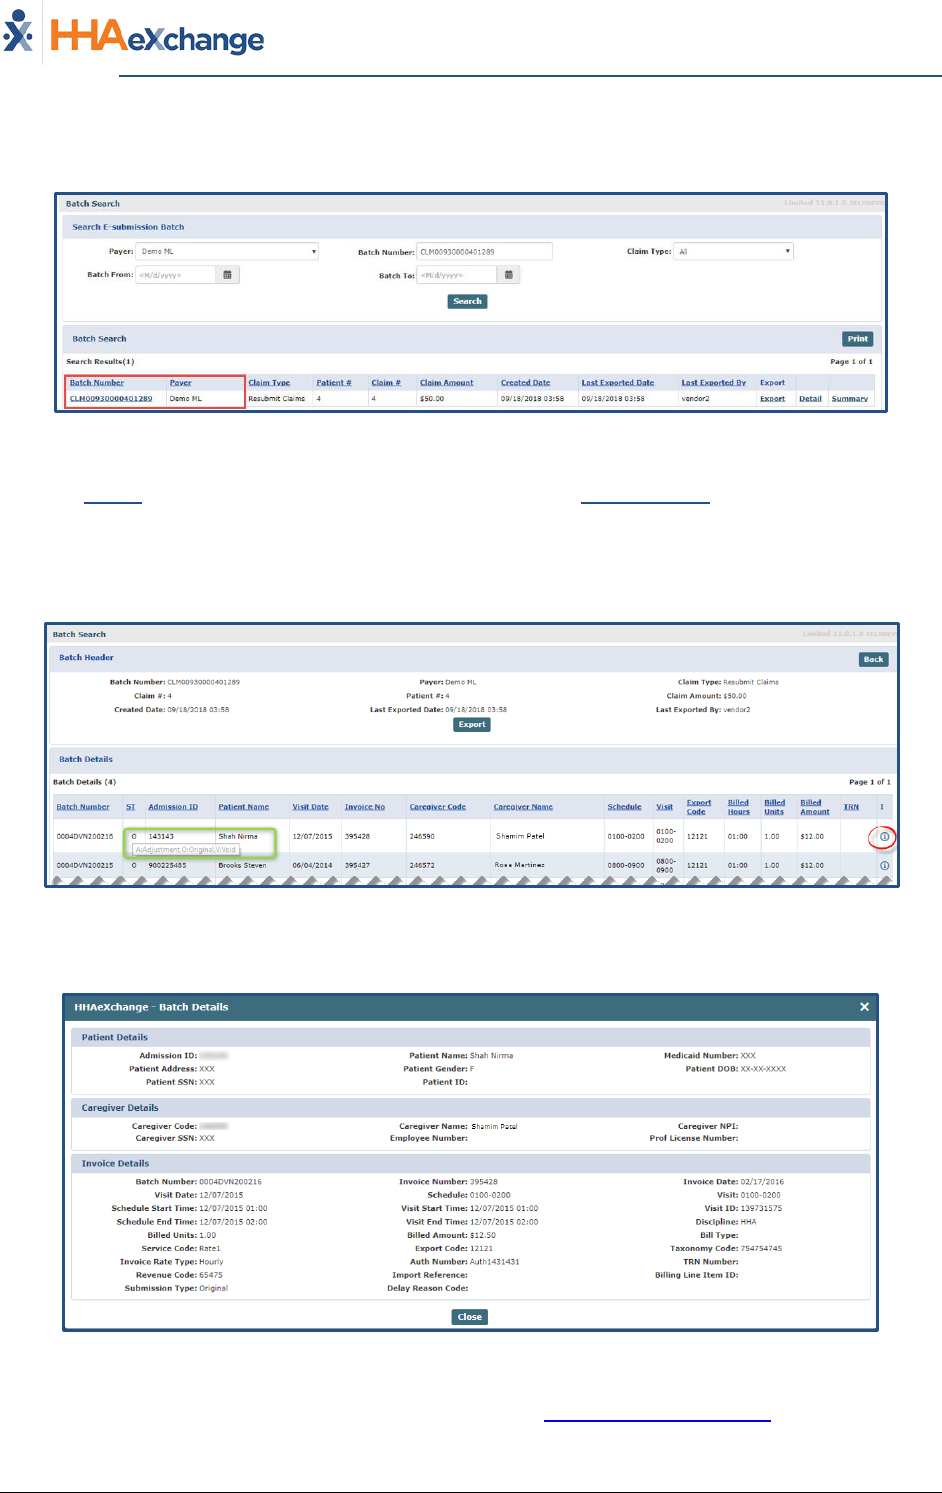
The image below illustrates a search result according to the Resubmit Claims type.
Resubmitted Claims Search Results
The Provider System
Billing Process Guide Page | 18 Billing Exceptions and Invoicing
Rebill Function Proprietary & Confidential
Searches can also be generated by Payer and Claim Batch Number, as seen in the image below.
Payer and Batch Number Search Results
Click the Export link to download the exported batch or click the Batch Number link to open and view
the batch details (as seen in the image below). Hovering over the Status column indicates the
Submission Type (A=Adjustment; O=Original; V=Void).
Note: The system does not generate a new export or resend to the Payer via this option.
Batch Details
Click on the information icon (i) under the “I” column to view further record details (as illustrated in the
image below).
Record Details
For various scenarios on the Rebill functionality, refer to the Provider Rebilling Job Aid
.
The Provider System
Billing Process Guide Page | 19 Billing Exceptions and Invoicing
Rebill Function Proprietary & Confidential
Payer Restriction on Rebilling Original Claims
Payers can remove the Original option from the Rebilling options on a Claims Adjustment (Billing >
Electronic Billing > New Batch > Resubmit Claims). The Restrict Rebilling of Original Claims feature
allows Payers to eliminate duplication of claims that may be resubmitted. This feature is enabled and
managed by the Payer.
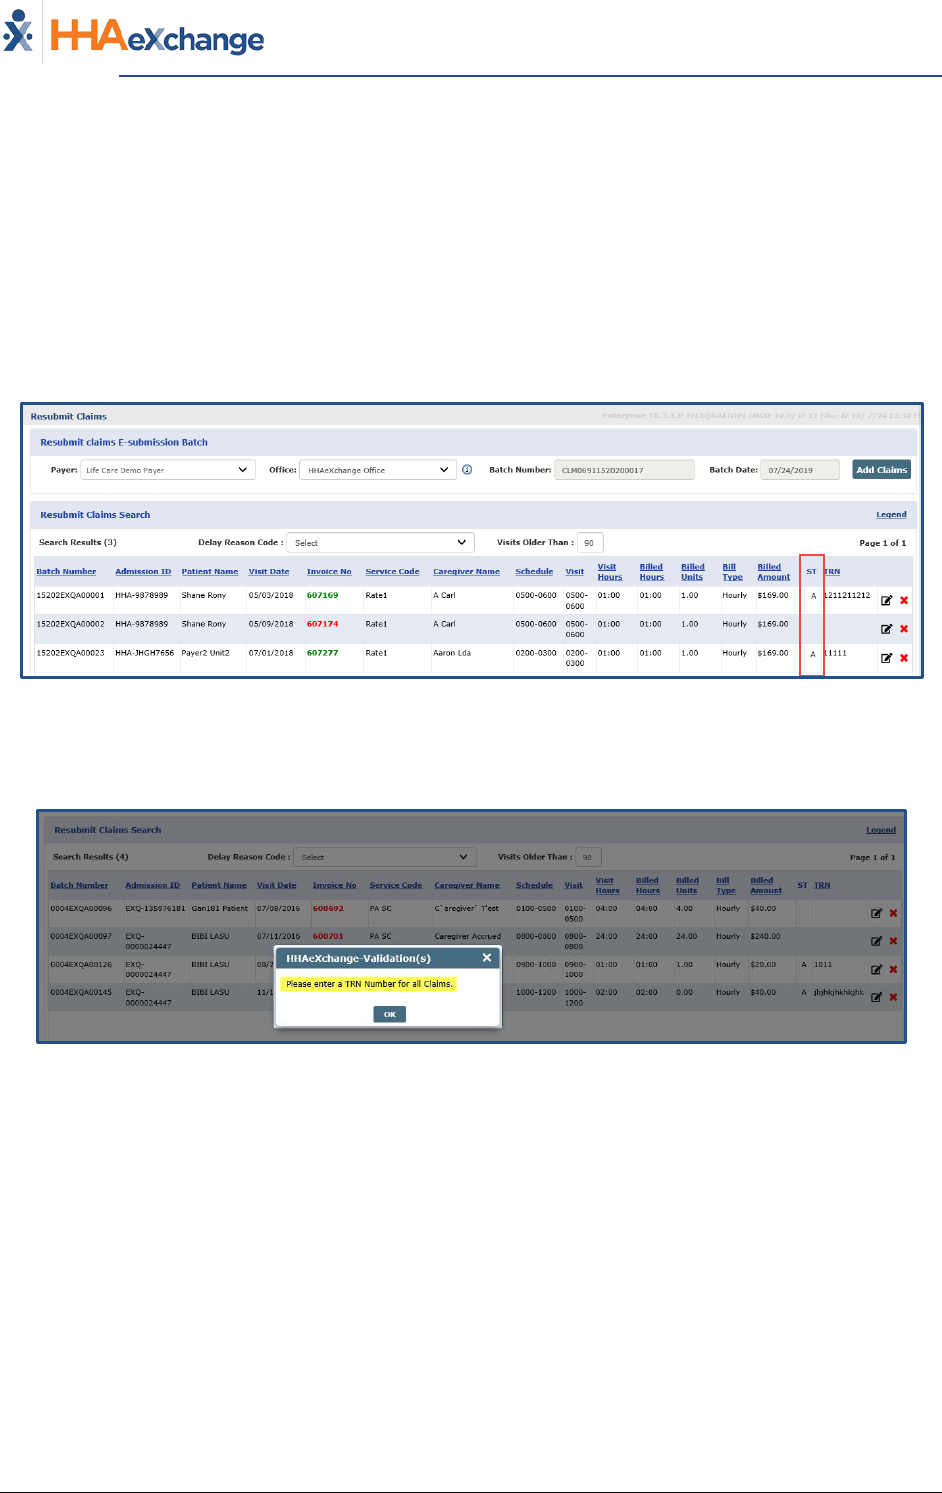
When this feature is enabled, the Submission Type (ST) column in the Resubmit Claims page displays
“A” for those claims that have been resubmitted as an Adjustment and have a TRN Number. Records
without a TRN Number display blank.
Resubmit Claims: Claims with A Status
Only claims with a TRN Number and Submission Type of Adjustment or Void can be downloaded and
exported.
TRN Required Validation
Note: If this feature is not enabled by the Payer, then the system continues to function as usual (with the Original
option available).

The Provider System
Billing Process Guide Page | 20 Billing Exceptions and Invoicing
Rebill Function Proprietary & Confidential
Claim Adjustment: Submission Type Field
On the Claim Adjustment window, if the Restrict Rebilling of Original Claims feature is enabled, then
only the Adjustment and Void options are available from the Submission Type field (the Original option
does not display). If the TRN is available in the TRN field, then Adjustment is selected by default in the
Submission Type field; displayed as “A” in the Resubmit Claims page.
Claim Adjustment: Submission Type Field
The Provider System
Billing Process Guide Page | 21 Billing Exceptions and Invoicing
Preventing Billing Greater Than 24 Hours Proprietary & Confidential
Preventing Billing Greater Than 24 Hours
Payers can set an E-Billing rule to prevent claims containing visits longer than 24 hours in duration from
being billed until they are corrected.
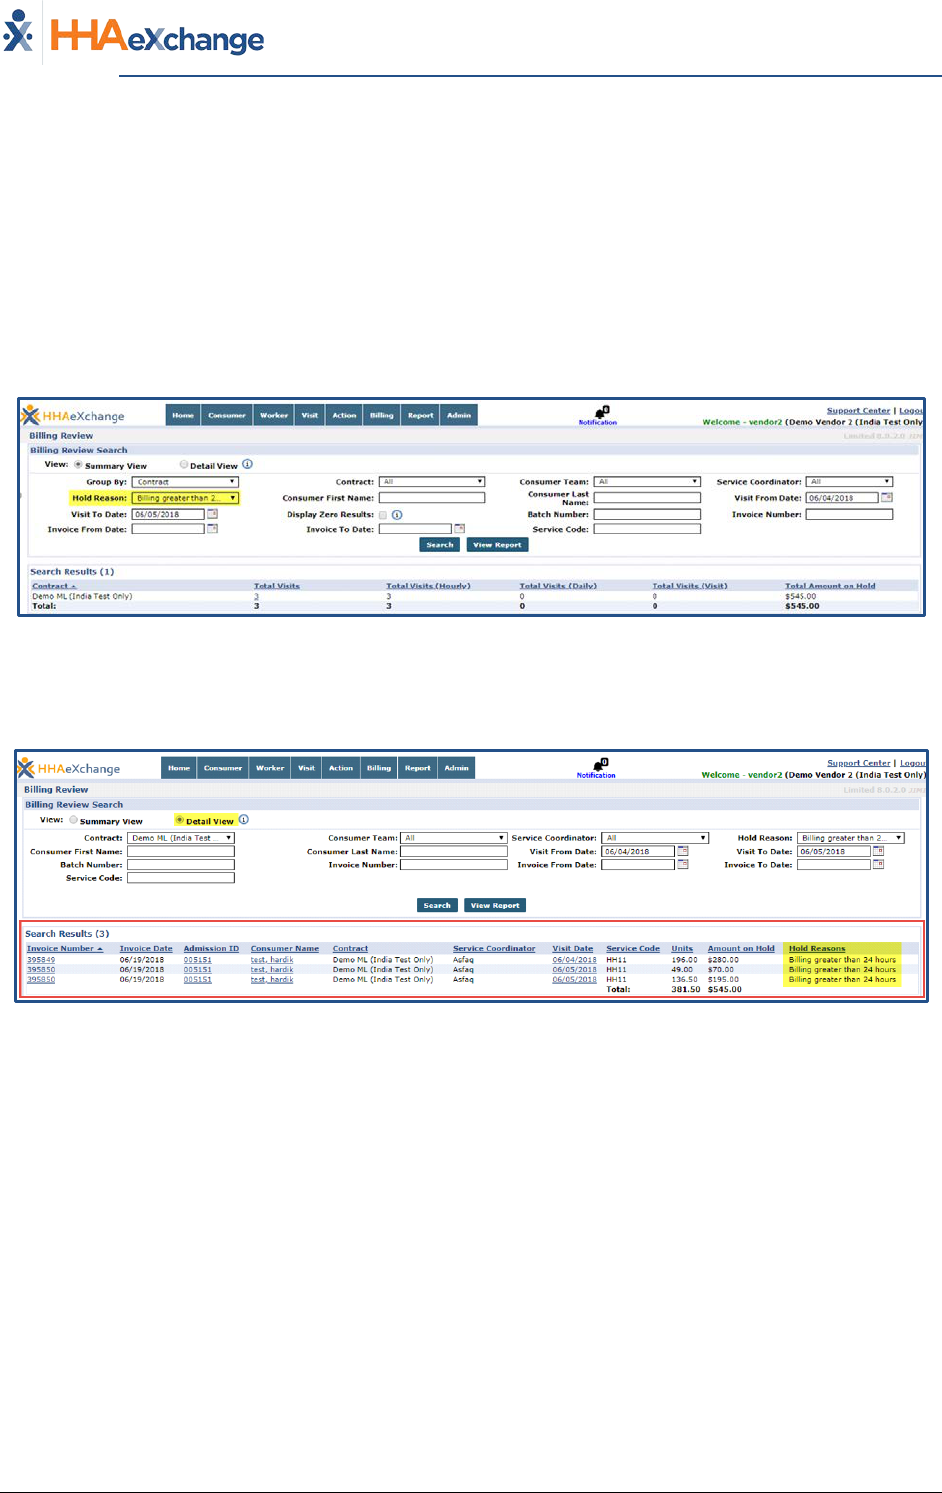
Upon activation of the “Prevent billing greater than 24 hours” E-Billing Rule, Providers are restricted on
e-billing Visits that exceed the 24 hours in one day. Under the Hold Reason in the Billing Review
(Summary View) page, this E-Billing rule has been added to generate searches for such cases (as
illustrated in the following image).
Billing Review – Summary View
As illustrated in the image below, the Detail View of the filtered Visits with the “Billing greater than 24
hours” appear and are restricted for E-Billing.
Billing Review – Detail View
The Provider System
Billing Process Guide Page | 22 Billing Exceptions and Invoicing
Entering Revenue and Taxonomy Codes (as Required by Payer) Proprietary & Confidential
Entering Revenue and Taxonomy Codes (as
Required by Payer)
In the HHAX system, Payers set the Service Code
Rates to include the Revenue and Taxonomy
Codes (per rate).
To support 837i billing, Payers have the option to
require Providers to enter their own unique
Revenue and Taxonomy Codes via the Reference
Table Management functionality (Admin >
Reference Table Management > Service Code).
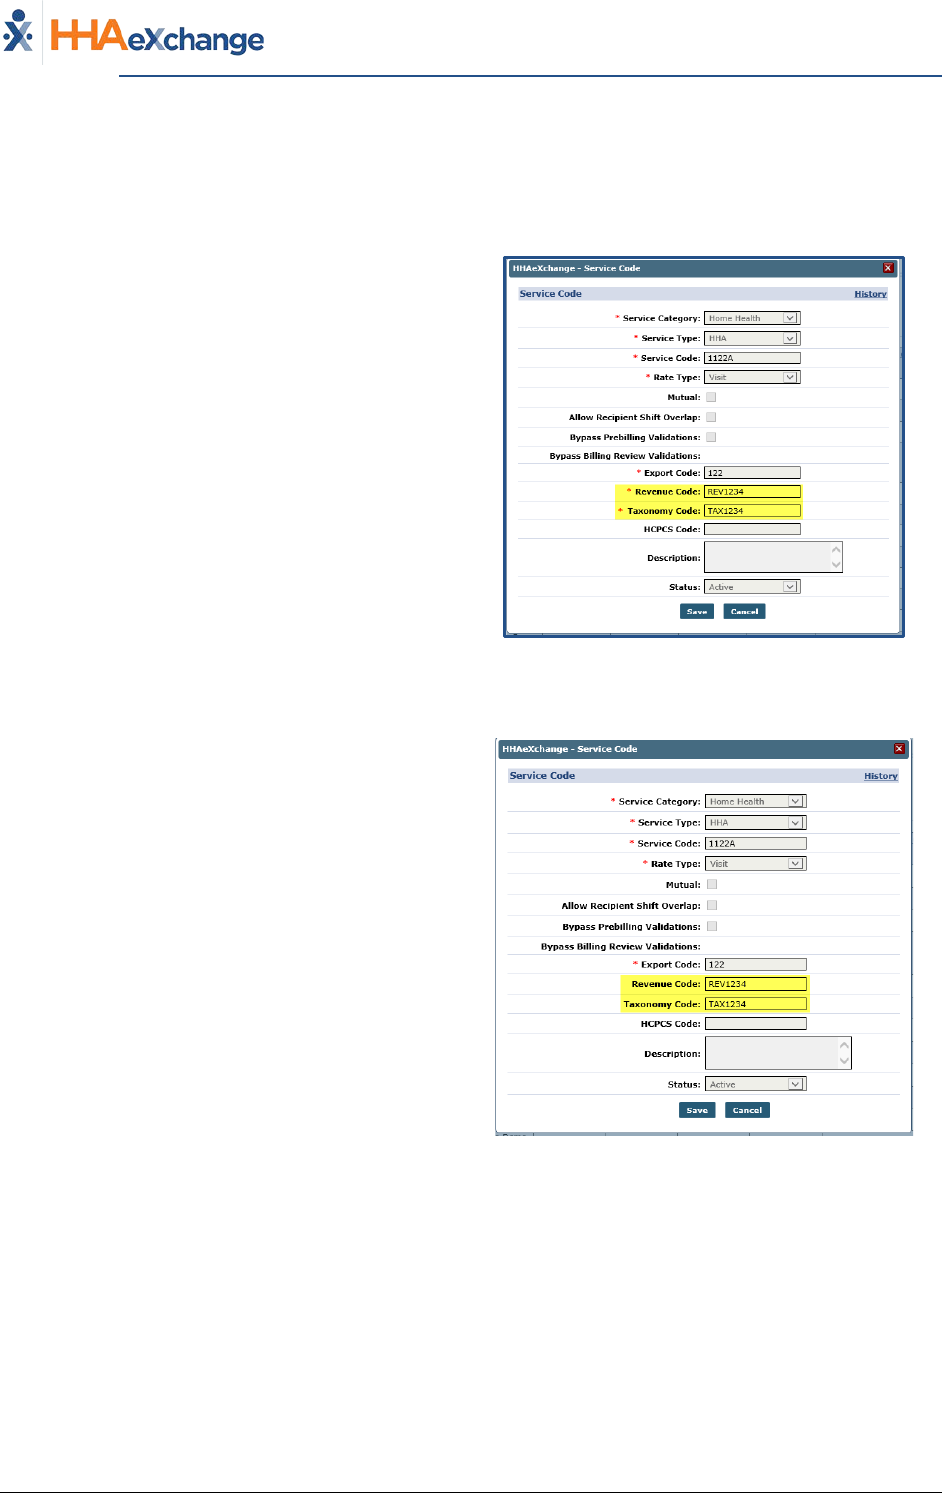
If a Provider is required to enter these codes, the
Revenue Code and Taxonomy Code fields are
required (as denoted with a red asterisk).
Required Revenue/Taxonomy Codes
(as enabled by the Payer)
If a Payer does not enable the Provider to set the
Revenue Code and/or the Taxonomy Code, the
system applies the Payer-assigned codes by
default (although the fields may appear editable
on the Service Code screen).
Payer Default Revenue/Taxonomy Codes applied
The Provider System
Billing Process Guide Page | 23 Billing Exceptions and Invoicing
Entering Revenue and Taxonomy Codes (as Required by Payer) Proprietary & Confidential
Reference Table Management – Service Code Changes
Revenue and Taxonomy Codes are set up via the
Reference Table Management function (Admin >
Reference Table Management > Contract Service
Code).
Locate and click on the applicable Service Code
link to open the Service Code window.
Only the Revenue Code and Taxonomy Code
fields are available to edit.
Click Save to apply changes.
Service Code Window (Reference Table Management)
Billing Review - Revenue and Taxonomy Code Rules
The Billing Review function helps Providers verify existing Revenue and Taxonomy Codes for selected
Visit(s) based on the selections on the Provider level.
● If the options are enabled at the Provider level, then the Service Code applied to the Visit has
the Revenue and Taxonomy Codes assigned at the Provider Service Code level.
● If the options are not enabled at the Provider level, then the Service Code applied to the Visit
has the Revenue and Taxonomy Codes assigned at Payer Service Code level.
Processing Files - Change Export to Apply Provider Data
Once an e-billing batch is created those records appear in the File Processing page (Admin > File
Processing). From here, click the Export link to export. E-Billing exports use the Provider Revenue and
Taxonomy Codes data associated with a given Service Code of Visit.
The Provider System
Billing Process Guide Page | 24 Billing Exceptions and Invoicing
View Claim Status Based on 999/277ca Proprietary & Confidential
View Claim Status Based on 999/277ca
This feature is enabled by HHAX System Administration. Please contact HHAX Support
Team for details, setup, and guidance.
This enhancement applies to claims submitted as of the release date. Claims Status will
not be available for any claims submitted prior to this release.
Payers and Providers can view a claim status once a Provider submits an 837 to the Payer. With this
visibility, Providers have the ability to capture any issues prior to receiving the 835 as well as reduce
duplicate billing. Refer to the Claims Status column in the Invoiced Visit Search page (Billing > Invoice
Search > By Visit) and the Patient Financials page under the E-Submission/Batch Info tab (Patient >
Financial > E-Submission/Batch Info).
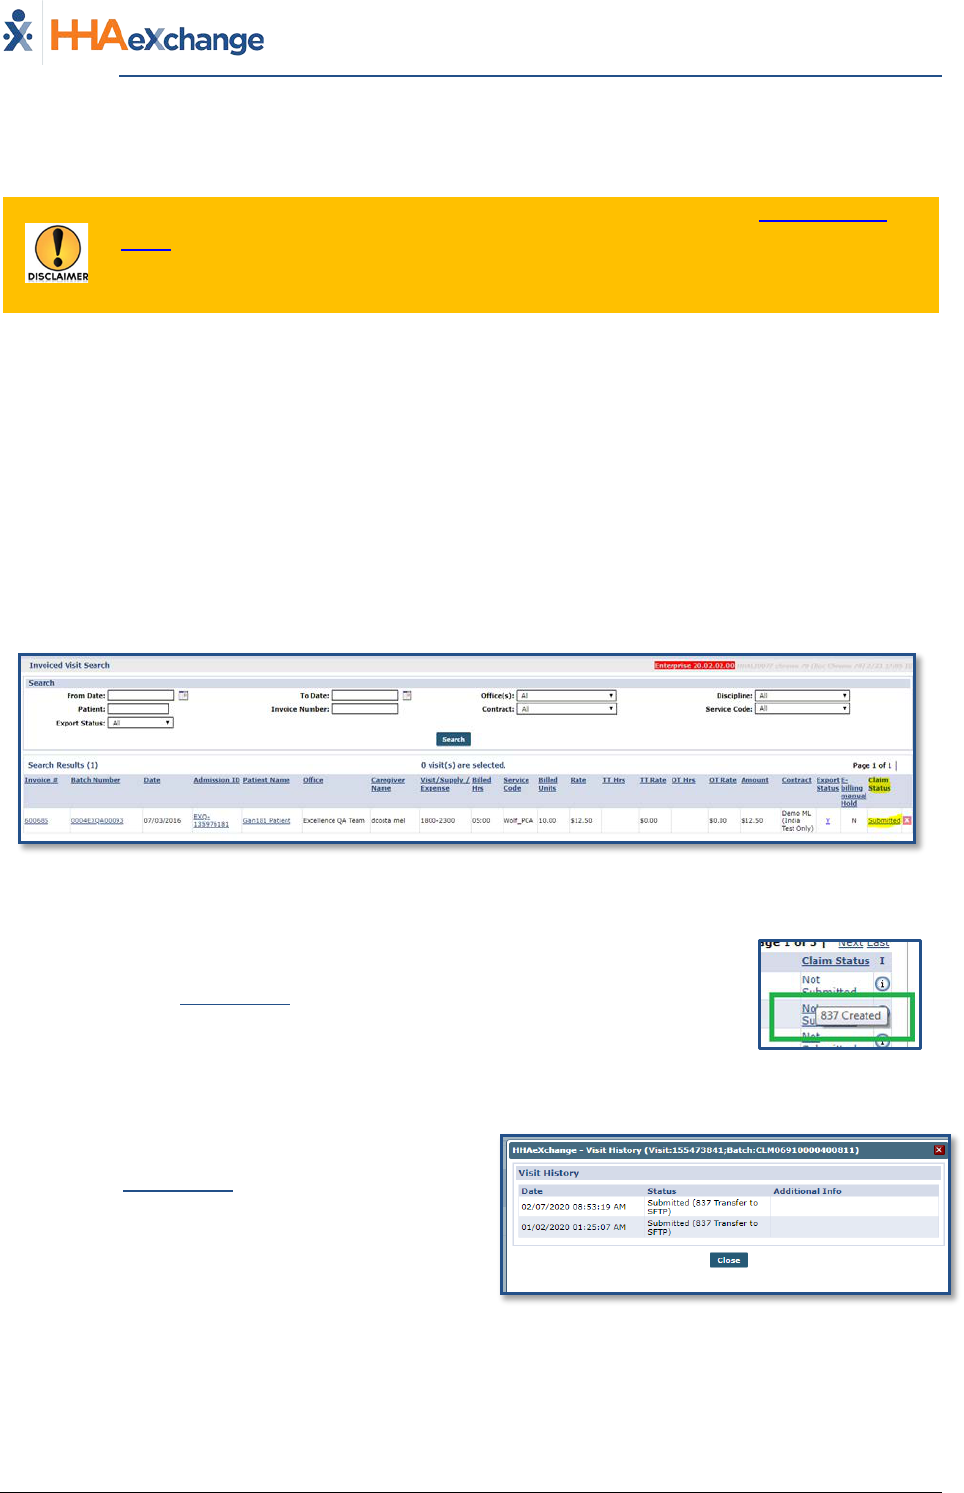
The image below illustrates the Claim Status column in the search result grid of the Invoiced Visit Search
page. Once a visit is submitted, the Claim Status appears as a hyperlink, as seen in the image below.
Claim Statuses include: Not Submitted, Submitted, Accepted (999), Rejected (999), Unexported,
Resubmitted, Accepted (277ca) and Rejected (277ca).
Invoiced Visit Search: Claim Status Column
Hovering over the Claim Status link provides a tool tip for the status. In this
example, the invoice has been Created, but not yet Submitted.
Status Tool Tip
Click on the Claim Status (hyperlink) to view the
claim history on the Visit History.
Note: The latest submitted Claim Status displays for
invoices that are submitted multiple times.
Claim Status: Visit History Window
Note: The same system behavior applies to the Patient Financial page.
