
© Copyright 2023 HHAeXchange | 130 West 42nd Street, 2nd Floor | New York, NY 10036
Billing Process Guide
Provider User Guide

The Provider Portal
© Copyright 2023 HHAeXchange | 130 West 42nd Street, 2nd Floor | New York, NY 10036
Document Revision History
Date
Description of Revision
10/08/2020 Initial version of the document
03/15/2021 Accessibility standards applied
06/21/2022 Non-Silverlight workflow applied
08/23/2022 General updates
04/18/2023 Apply general updates and remove Non-Silverlight references
10/06/2023 Update billing workflow

The Provider Portal
© Copyright 2023 HHAeXchange | 130 West 42nd Street, 2nd Floor | New York, NY 10036
Table of Contents
Overview ............................................................................................................................................. 1
HHAX System Key Terms and Definitions.......................................................................................... 1
The Billing Process ............................................................................................................................... 2
New Invoice Batch (Internal)................................................................................................................ 3
Review Invoice Details ......................................................................................................................... 5
By Batch .......................................................................................................................................... 5
By Invoice ........................................................................................................................................ 6
By Visit............................................................................................................................................. 7
Billing Review ...................................................................................................................................... 8
Create a New Claims Batch ................................................................................................................ 10
Reviewing a Claims Batch (Optional) .................................................................................................. 13
Rebilling (Resubmit Claims)................................................................................................................ 14
Rebilling Adjustment Types................................................................................................................ 18
Original .......................................................................................................................................... 18
Adjustment .................................................................................................................................... 18
Void ............................................................................................................................................... 18
Remittances Tab ................................................................................................................................ 20
The Provider Portal
Billing Process Guide Page | 1 Provider User Guide
Overview Proprietary & Confidential
Overview
This process guide covers the Billing process and functionality via the HHAeXchange (HHAX) system,
consisting of:
• Invoicing Visits
• The Billing Review functionality
• Rebilling
• Viewing Remittances
Please direct any questions, thoughts, or concerns regarding the content herein to
HHAeXchange Customer Support
.
HHAX System Key Terms and Definitions
The following provides basic definition of HHAX System key terms applicable throughout the document.
Term
Definition
Patient
Refers to the Member, Consumer, or Recipient. The Patient is the person receiving
services.
Caregiver
Refers to the Aide, Homecare Aide, Homecare Worker, or Worker. The Caregiver is the
person providing services.
Provider
Refers to the Agency or organization coordinating services.
Payer
Refers to the Managed Care Organization (MCO), Contract, or HHS. The Payer is the
organization placing Patients with Providers.
HHAX
Acronym for HHAeXchange

The Provider Portal
Billing Process Guide Page | 2 Provider User Guide
The Billing Process Proprietary & Confidential
The Billing Process
This section covers the process of invoicing visits and the mechanisms within HHAX that ensures
exported invoices contain accurate billing information and follow all compulsory compliance and
authorization rules set up by each unique Payer.
The Billing Process is completed in 3 phases, as follows:
1. Creating a New Invoice Batch
2. Creating a New Claims Batch
3. Reviewing a Claims Batch (Optional)
Each phase is covered in the following sections.
The Provider Portal
Billing Process Guide Page | 3 Provider User Guide
New Invoice Batch (Internal) Proprietary & Confidential
New Invoice Batch (Internal)
Once a confirmed visit clears the Prebilling Review exception page (covered in the
Prebilling Process Guide) it can be Invoiced or processed and packaged to submit to a Payer. When
visits are invoiced in HHAX, the system compiles all the selected visits to be invoiced, at the time of
processing, in an Invoice Batch. Follow the steps below to invoice a visit and compile a New Invoice
Batch.
Step
Action
1
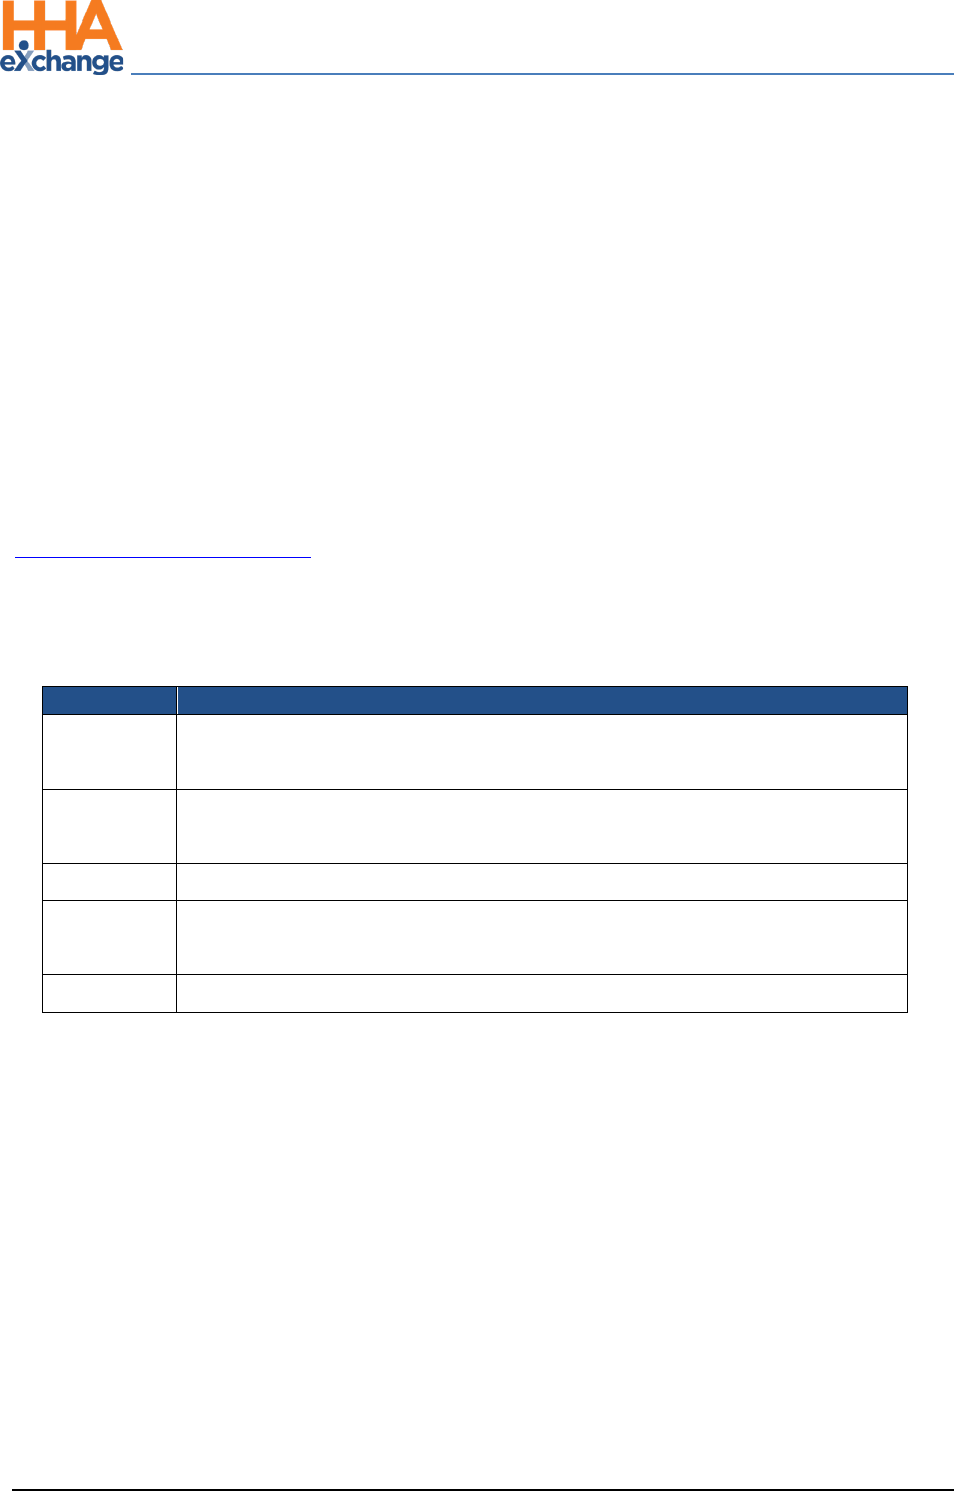
Navigate to Billing > New Invoice - (Internal) to generate a New Invoice Batch. Search for a
specific visit using the filters or click on Search to generate all results.
Note: To search all prior visits (eligible for invoicing), HHAX recommends that the From Date field is left
blank.
2
Review the results and select the visits to invoice.
New Invoice Batch (Internal): Invoice Batch
The Provider Portal
Billing Process Guide Page | 4 Provider User Guide
New Invoice Batch (Internal) Proprietary & Confidential
Step
Action
3
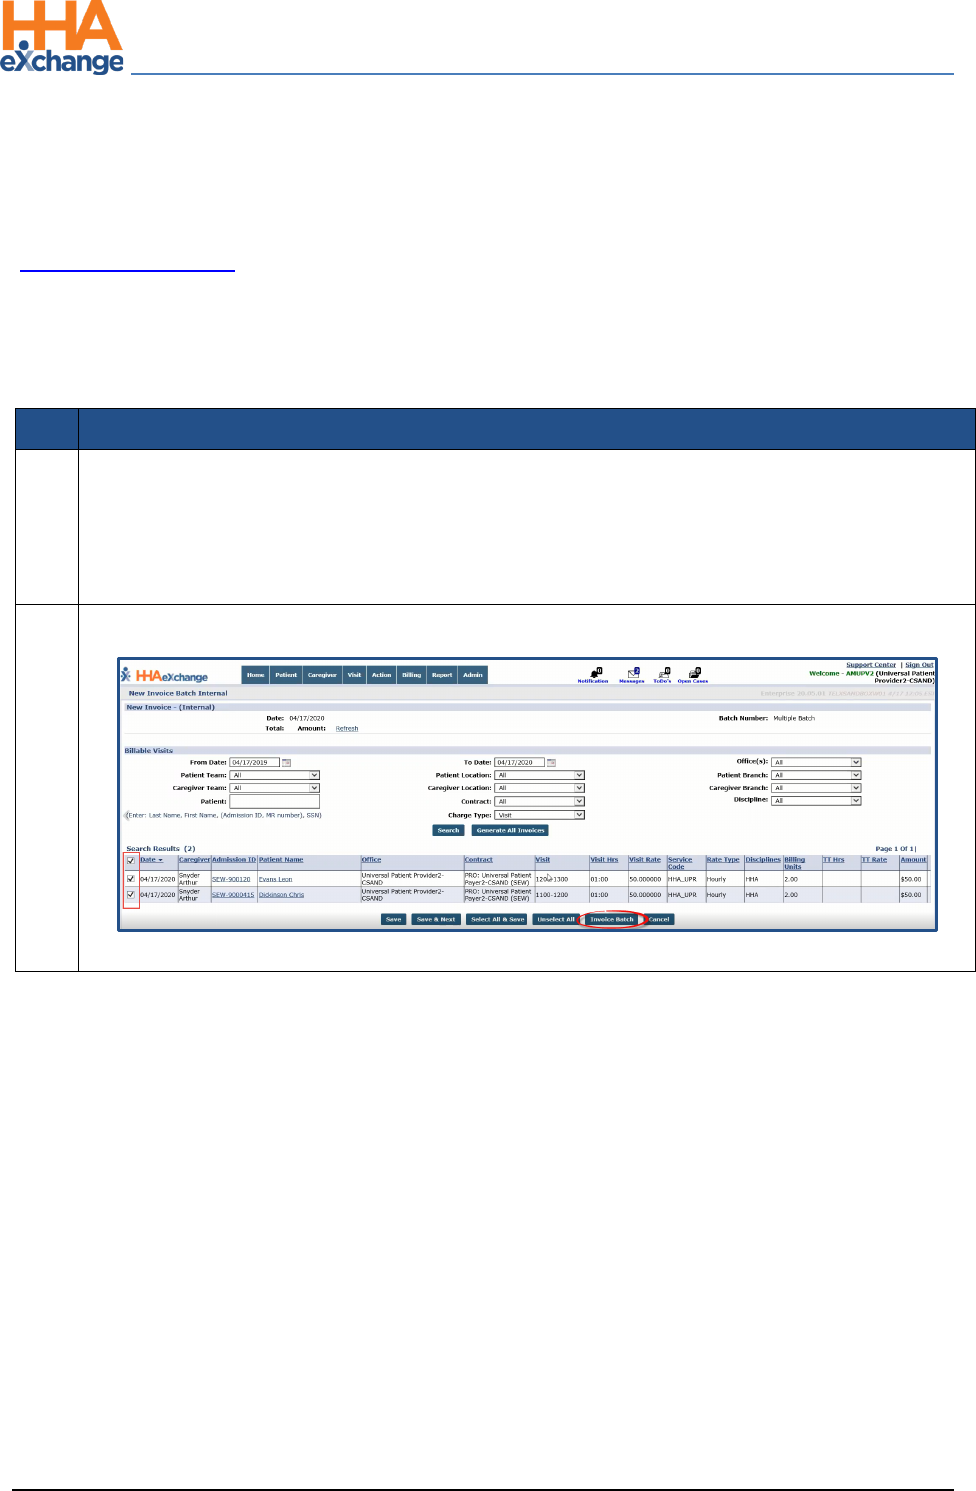
Once the visits are selected, there are various options at the bottom of the page as described in
the bullets below. Select an action button to proceed. To invoice, click on the Invoice Batch
button.
• Save: Saves all the selected visits without invoicing them. From here, navigate to the next
page of search results (if applicable) without losing the selection.
• Save & Next: Saves all the selected visits and loads the next page of search results (if
applicable).
• Select All & Save: Saves all visits on the current page. From here, navigate to the next page of
search results (if applicable) without losing the selection.
• Unselect All: Unselect any selected/saved visits.
• Invoice Batch: Invoice all selected visits and generate a new Invoice Batch.
• Cancel: Cancel entire batch
4
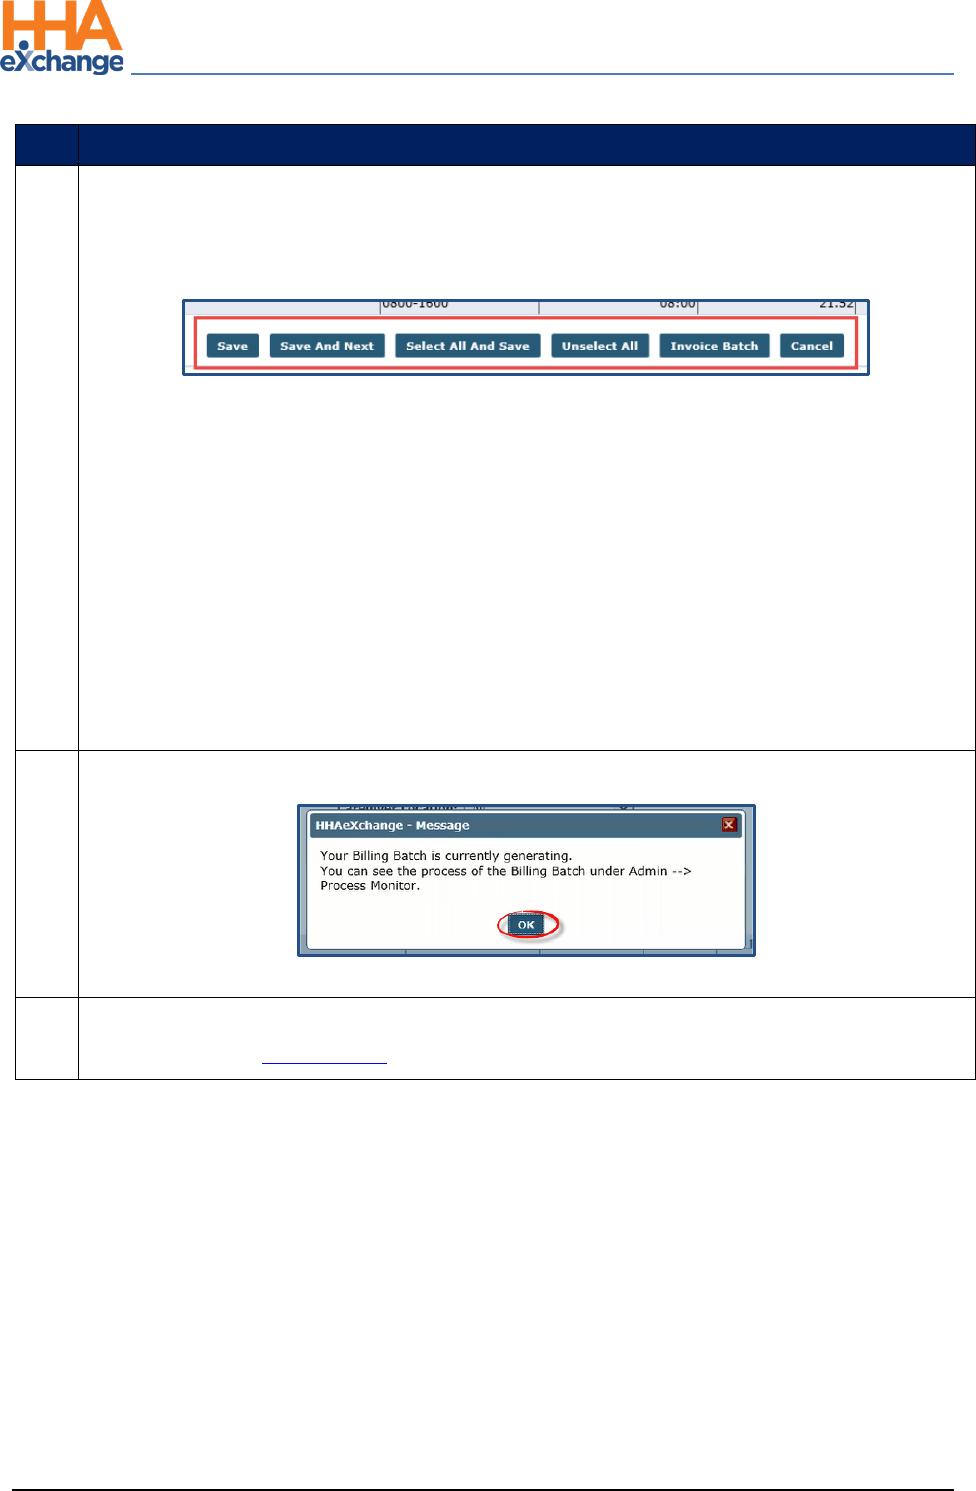
The system alerts that the Billing Batch is generating. Click OK to continue.
Note: Once invoiced, visit information cannot be changed.
5
Perform the Billing Review process to review any exceptions prior to submitting claims to the
Payer. Refer to the Billing Review section for details.
The Provider Portal
Billing Process Guide Page | 5 Provider User Guide
Review Invoice Details Proprietary & Confidential
Review Invoice Details
Reviewing processed invoices, specifically those with a Pending Status (not yet exported from HHAX)
allows Providers another opportunity to identify clerical errors that could be missed by the Prebilling
Review or Billing Review exception pages. Complete the following steps to review the details of
processed invoices By Batch, By Invoice and By Visit (as described in the following tables per option).
By Batch
Step
Action
1
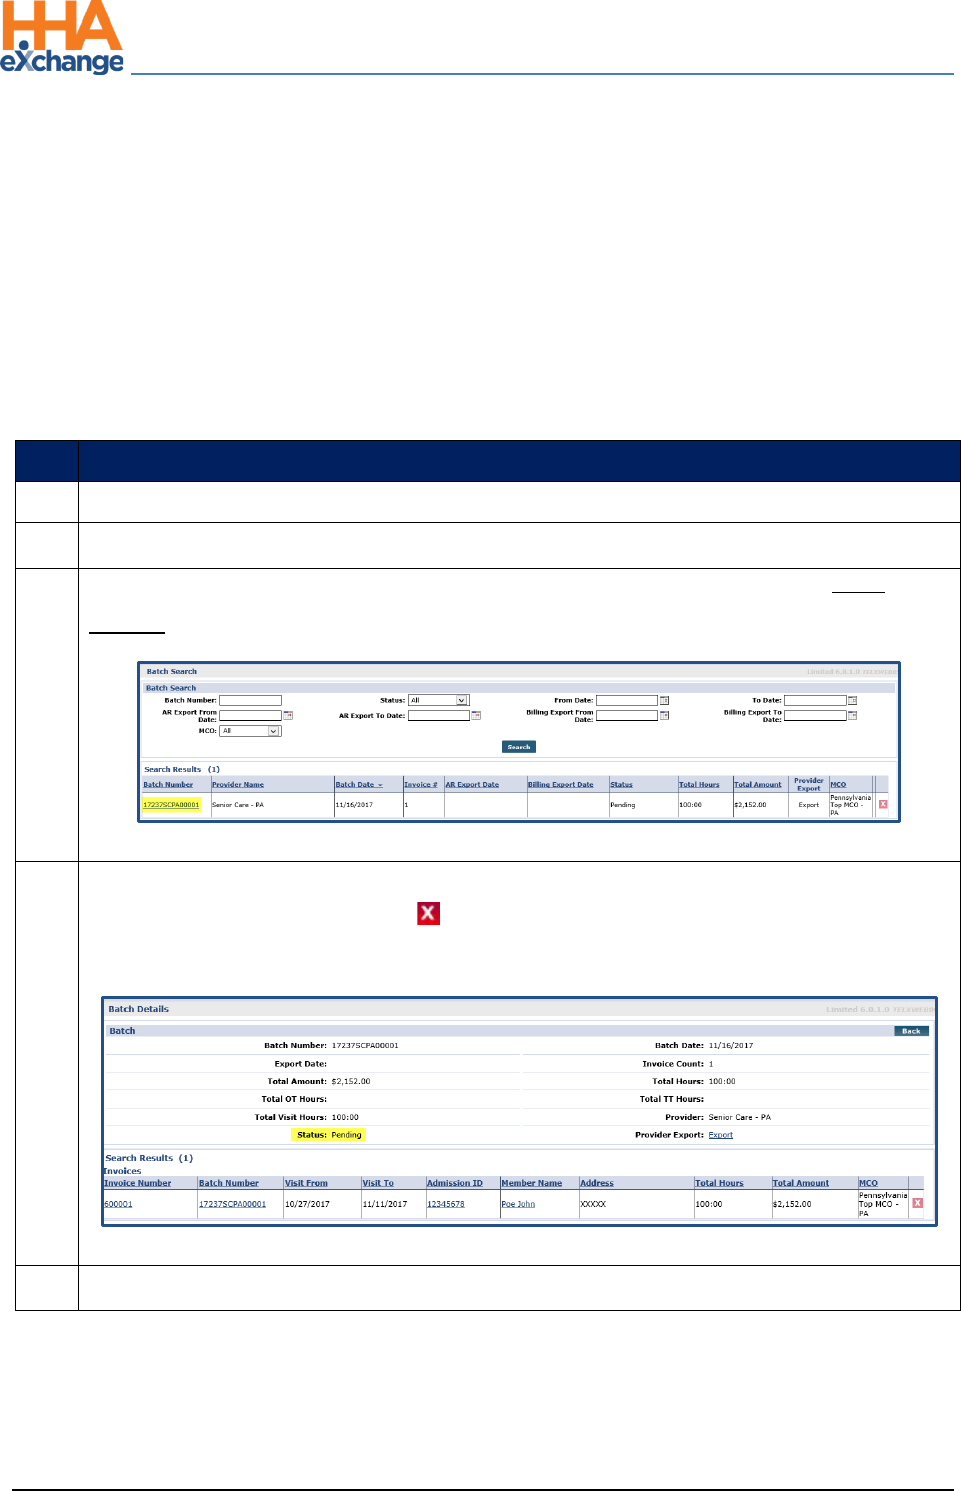
Navigate to Billing > Invoice Search > By Batch
2
Search for the batch using the available filters. Click the Search button.
3
The results generate invoice batches accordingly. Locate the batch and click on the Batch
Number (link) to review the individual invoices within a batch.
Search by Batch
4
Review the details. If an error is discovered, then a visit (with a Pending Status) can be removed
from an invoice by using the delete “ ” icon. Once an invoice has been exported (with a Billed
Status), visit information cannot be edited (or removed).
Invoices within a Batch
5
Click the Back button to navigate back to the search results page.
The Provider Portal
Billing Process Guide Page | 6 Provider User Guide
Review Invoice Details Proprietary & Confidential
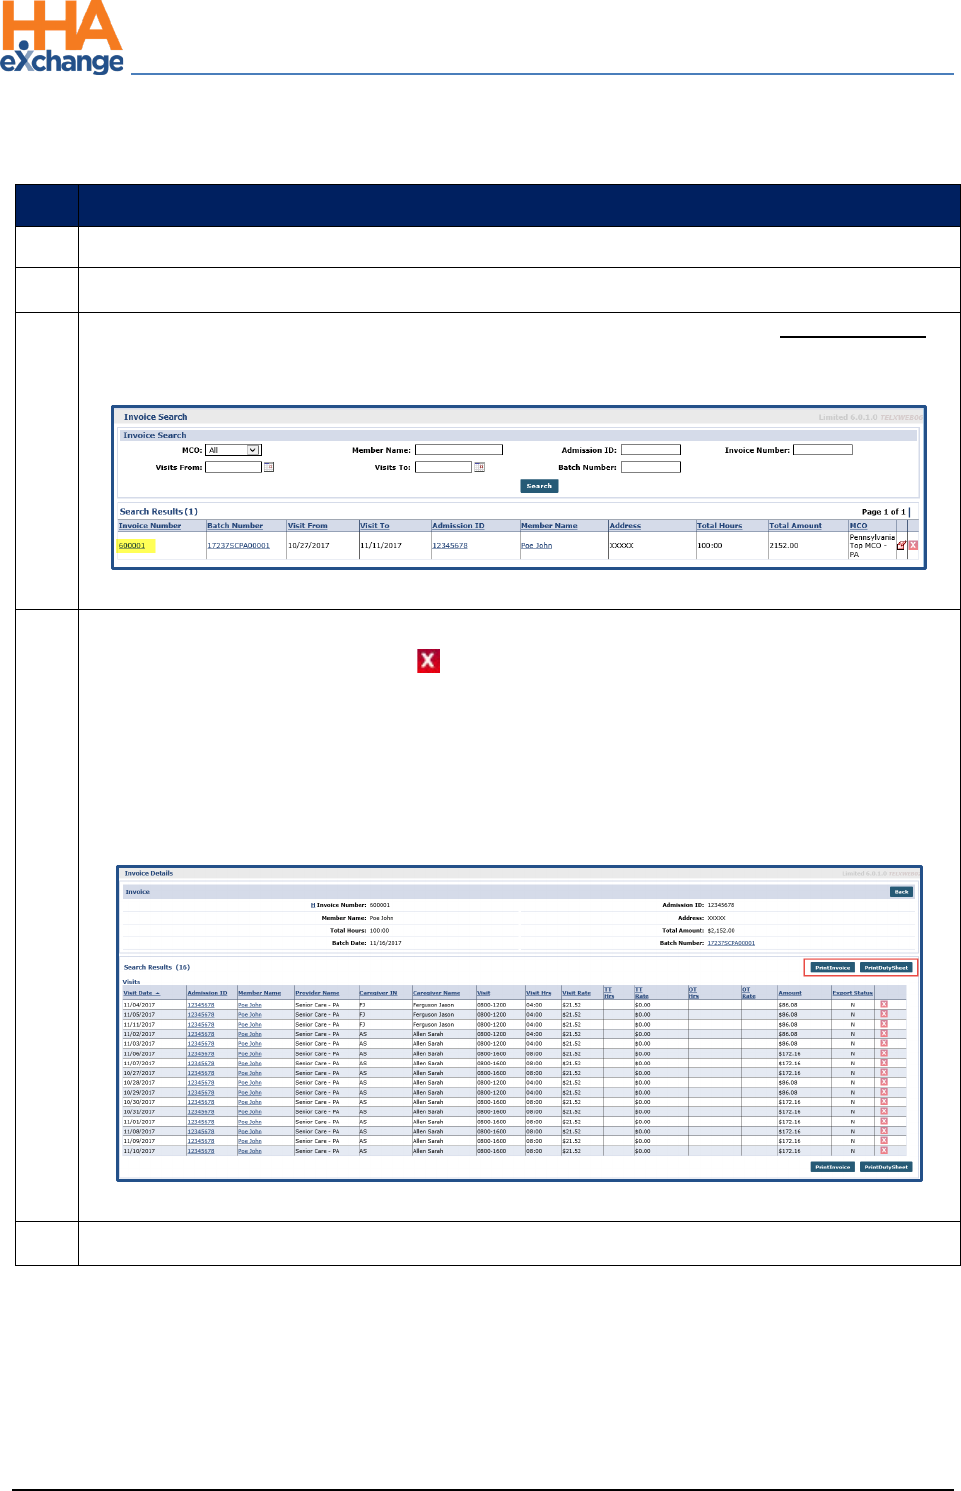
By Invoice
Step
Action
1
Navigate to Billing > Invoice Search > By Invoice
2
Search for the invoice using the available filters. Click the Search button.
3
The results generate invoices accordingly. Locate the invoice and click on the Invoice Number
(link) to review the individual invoice details.
Search by Invoice
4
Review the details. If an error is discovered, then a visit (with a Pending Status) can be removed
from an invoice by using the delete “ ” icon. Once an invoice has been exported (with a Billed
Status), visit information cannot be edited (or removed).
Click the Print Invoice button to print the invoice.
Click Print Duty Sheet button to print the Duty Sheet associated with the invoice (if/as
applicable).
Visits within an Invoice
5
Click the Back button to navigate back to the search results page.
The Provider Portal
Billing Process Guide Page | 7 Provider User Guide
Review Invoice Details Proprietary & Confidential
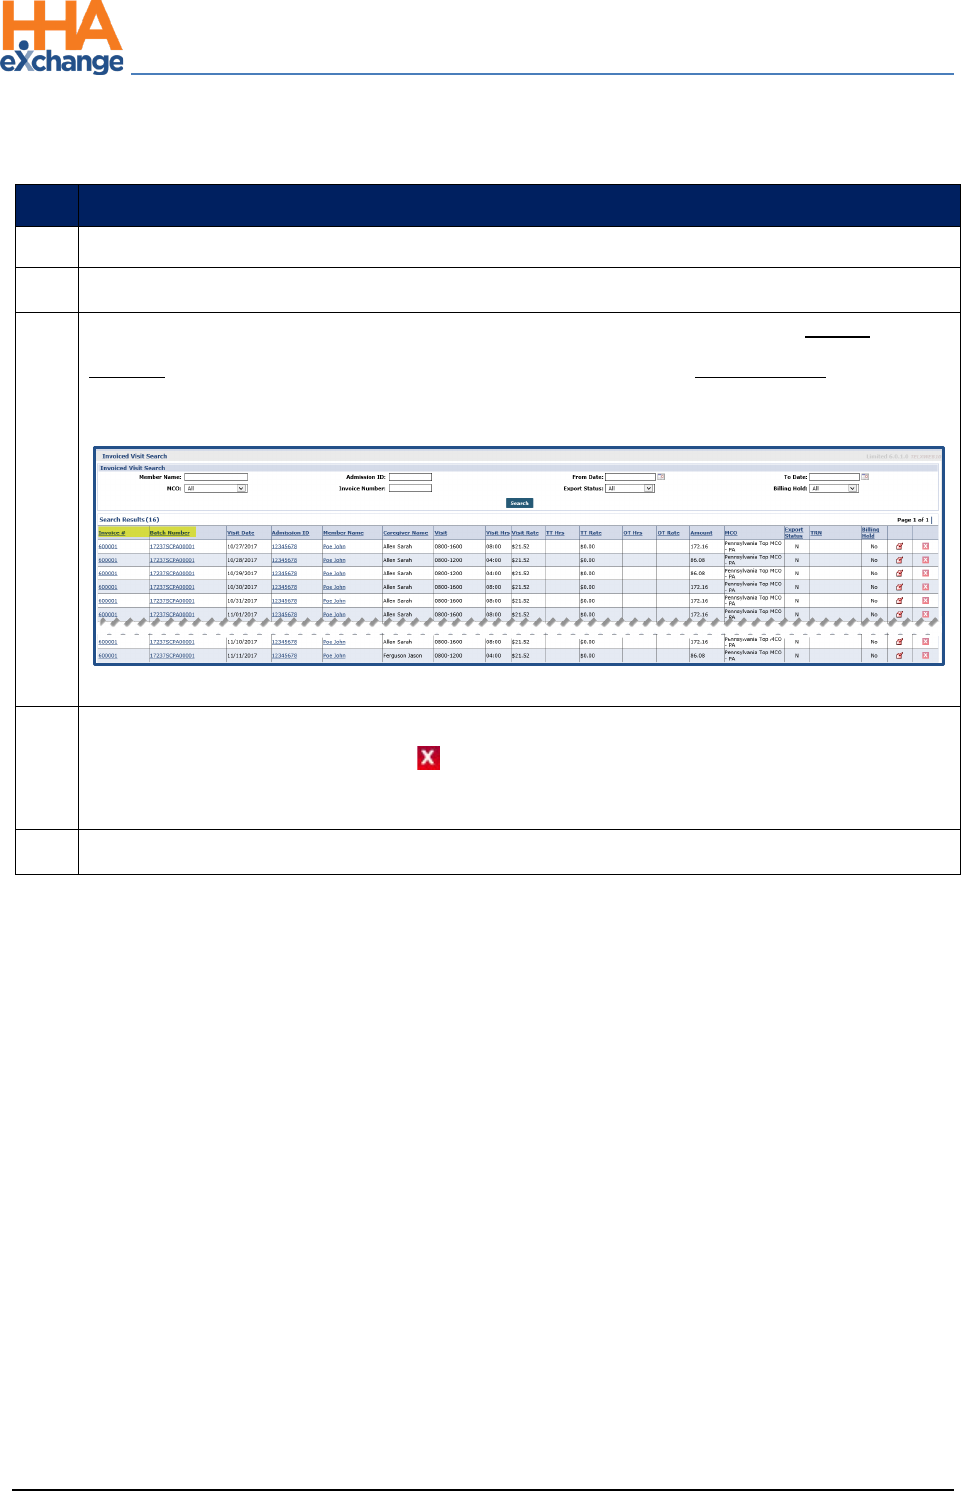
By Visit
Step
Action
1
Navigate to Billing > Invoice Search > By Visit
2
Search for the visit using the available filters. Click the Search button.
3
The results generate invoiced visits accordingly. Locate the visit and click on the Invoice
Number (link) to review the invoice the visit was included in, or the Batch Number link to
review the batch the visit was included in.
Search by Visit
4
Review the details. If an error is discovered, then a visit (with a Pending Status) can be removed
from an invoice by using the delete “ ” icon. Once an invoice has been exported (with a Billed
Status), visit information cannot be edited (or removed).
5
Click the Back button to navigate back to the search results page.
The Provider Portal
Billing Process Guide Page | 8 Provider User Guide
Billing Review Proprietary & Confidential
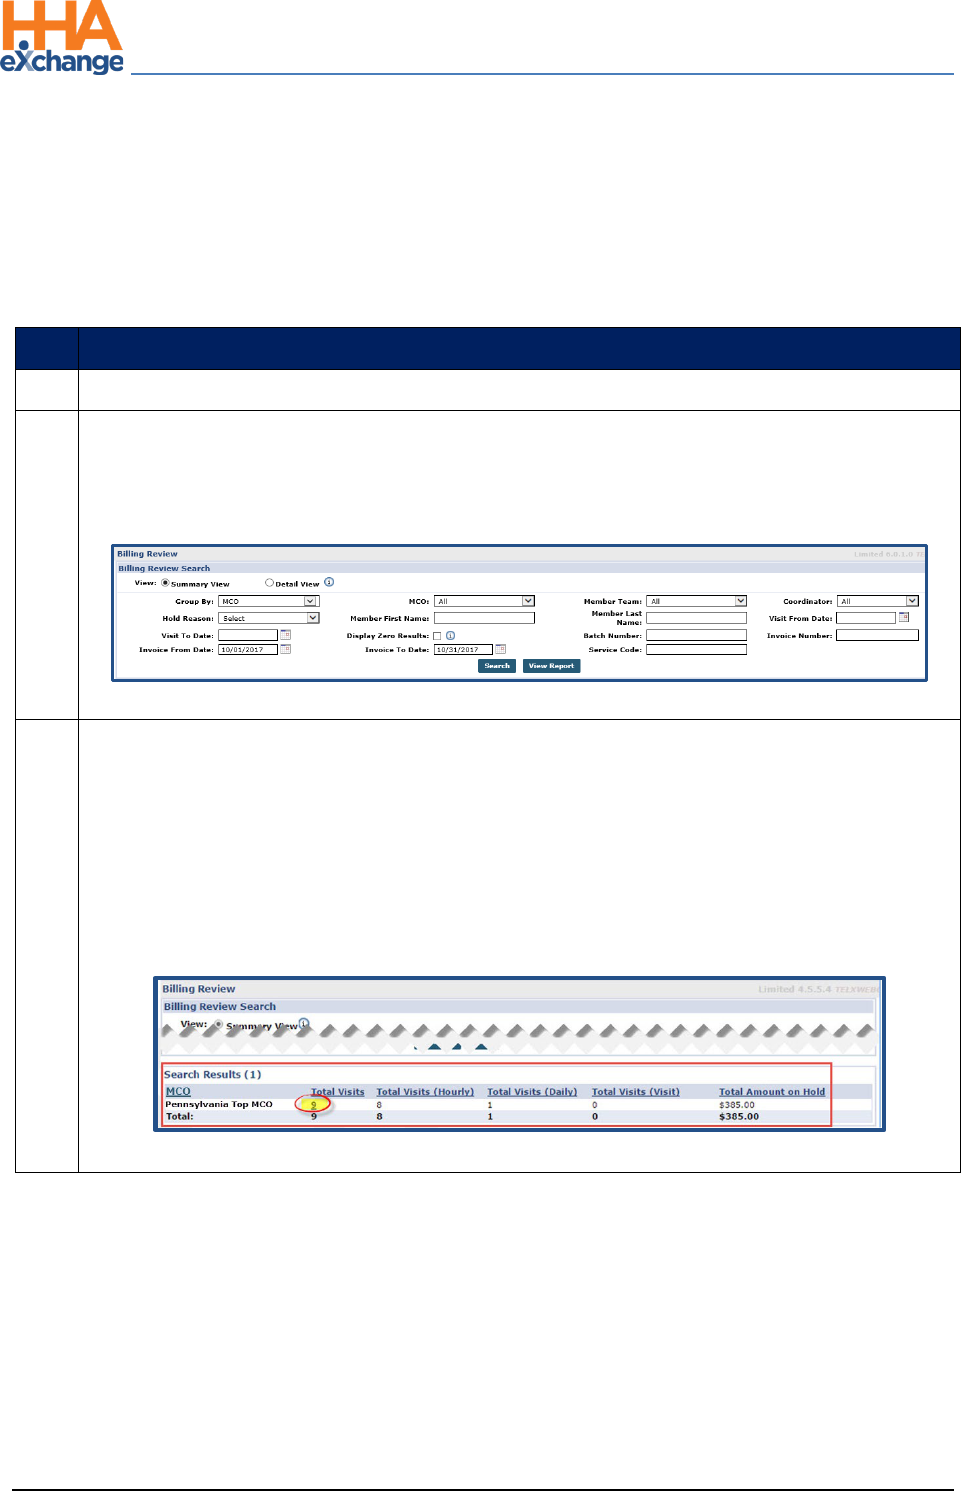
Billing Review
The Billing Review page is used to check invoiced visit information against export requirements specific
to each Payer. Invoiced visits that do not meet the export requirements are held on this page until the
issue is corrected. Complete the following steps to review invoiced visits held in the Billing Review page.
Step
Action
1
Navigate to Billing > Billing Review
2
Search to view all invoiced visits held in Billing Review. Click the Search button for all held visits
or specify search criteria using the available filters (such as Payer, Hold Reason, and Invoice
To/From date ranges).
Billing Review Search Filters
3
The results (summary) are generated beneath the search fields and filters. By default, the
system sorts by Payer. As illustrated, this summary provides a breakdown of the number of
visits on hold by type (Hourly, Daily, and Visit) as well as the Total Amount on Hold (total dollar
amount on hold).
The value under the Total Visits column is a link which loads a new screen displaying the search
results in a detailed view. Click the number (link) to proceed (in this case, “9”).
Billing Review: Summary View
The Provider Portal
Billing Process Guide Page | 9 Provider User Guide
Billing Review Proprietary & Confidential
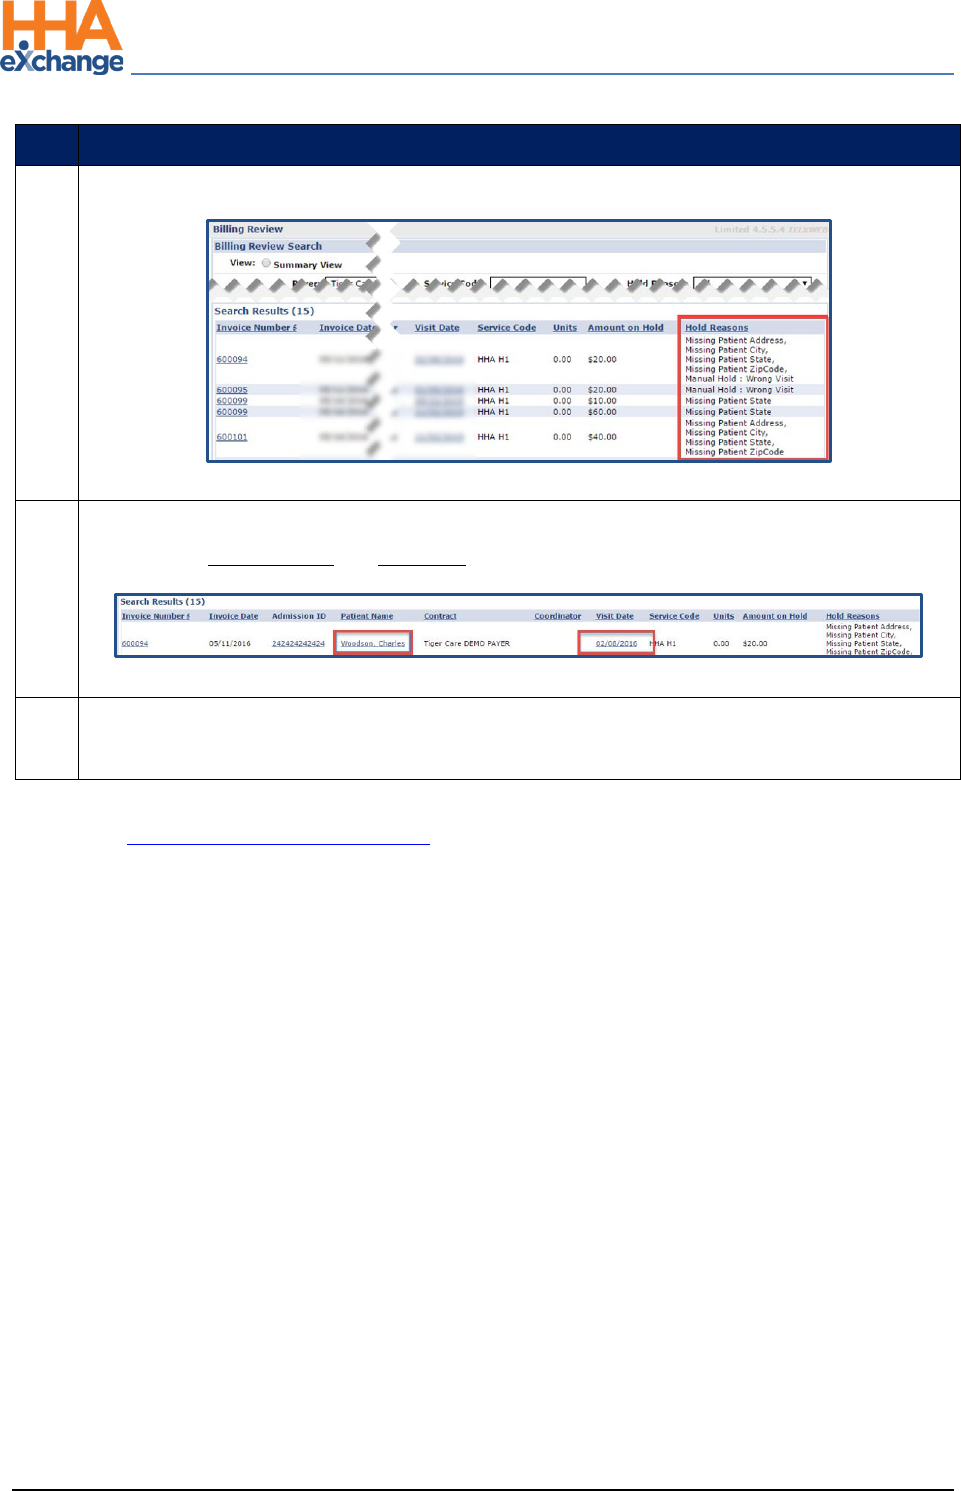
Step
Action
4
The Detailed View window displays the Hold Reasons per visit.
Billing Review: Detailed View
5
To resolve Hold Reasons, navigate directly to the Patient Profile and the Visit Window by
selecting the Patient Name and Visit Date links for the corresponding visit, respectively.
Patient Name and Visit Date Links
6
When the Hold Reason is resolved, the system automatically releases the visit from the Billing
Review page.
Refer to the Billing Review Resolutions Job Aid for guidance on resolving various types of Hold Reasons.
The Provider Portal
Billing Process Guide Page | 10 Provider User Guide
Create a New Claims Batch Proprietary & Confidential
Create a New Claims Batch
The next step is to generate a New Claims Batch. Complete the following steps to create a New Claims
Batch.
Step
Action
1
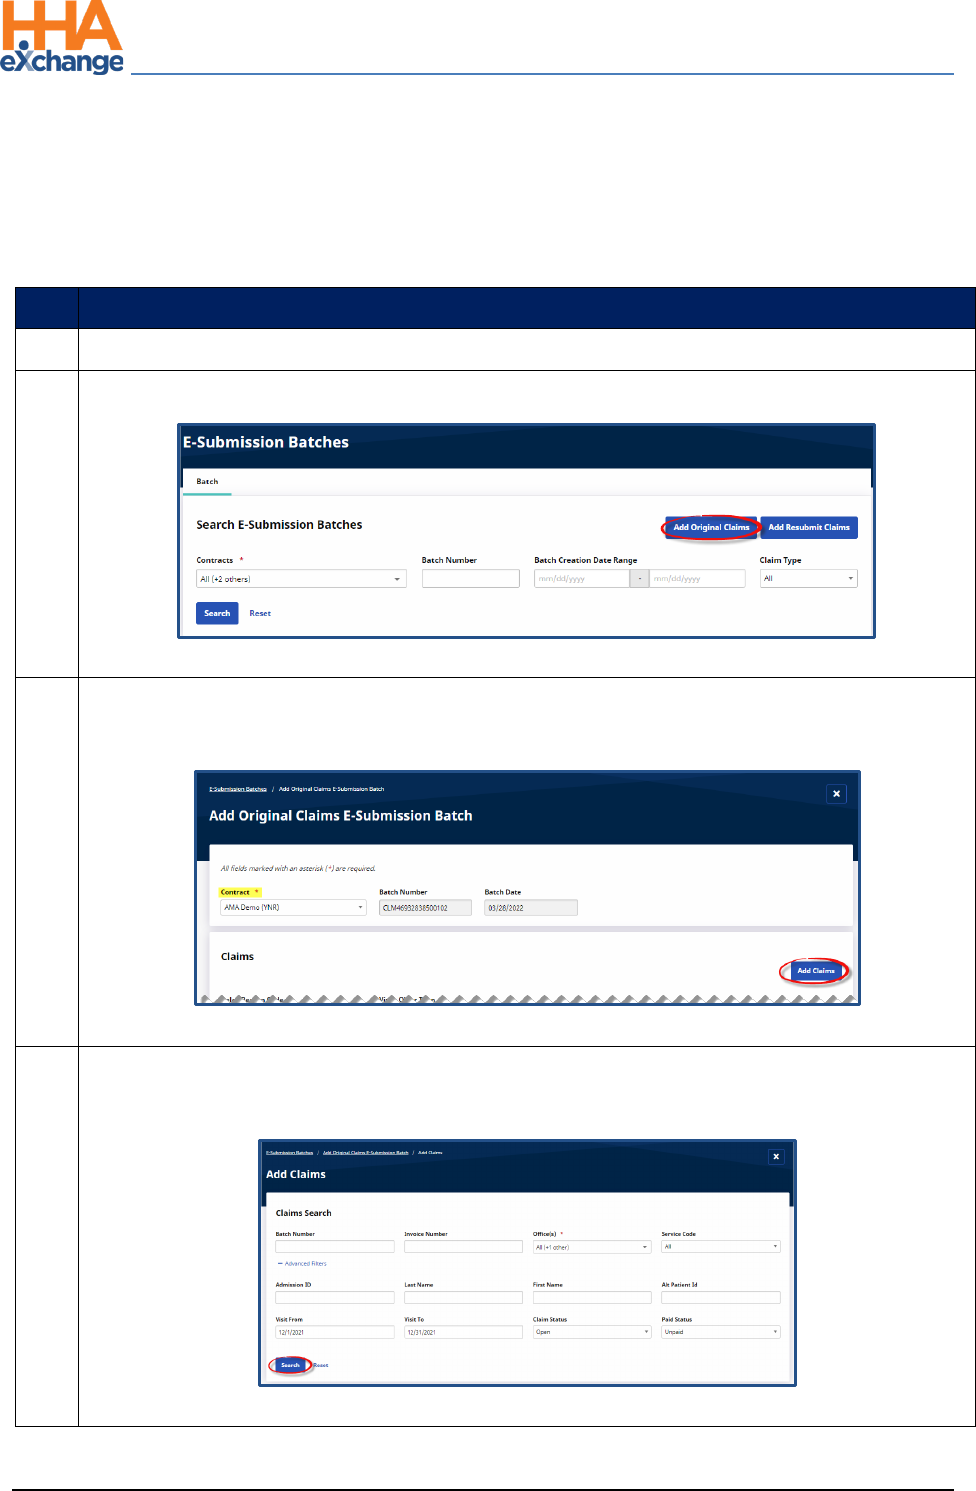
Navigate to Billing > Electronic Billing > E-Submission Batches to generate a New Batch Claim.
2
On the E-Submission Batches page, click on the Add Original Claims button.
Add Original Claims
3
On the Add Original Claims E-Submission page, select the Contract. The Batch Number and Batch
Date populate. Click on the Add Claims button.
Add Claims
4
On the Add Claims, Claims Search page, use the search filter fields or click on the Search button to
find claims.
Claims Search
The Provider Portal
Billing Process Guide Page | 11 Provider User Guide
Create a New Claims Batch Proprietary & Confidential
Step
Action
5
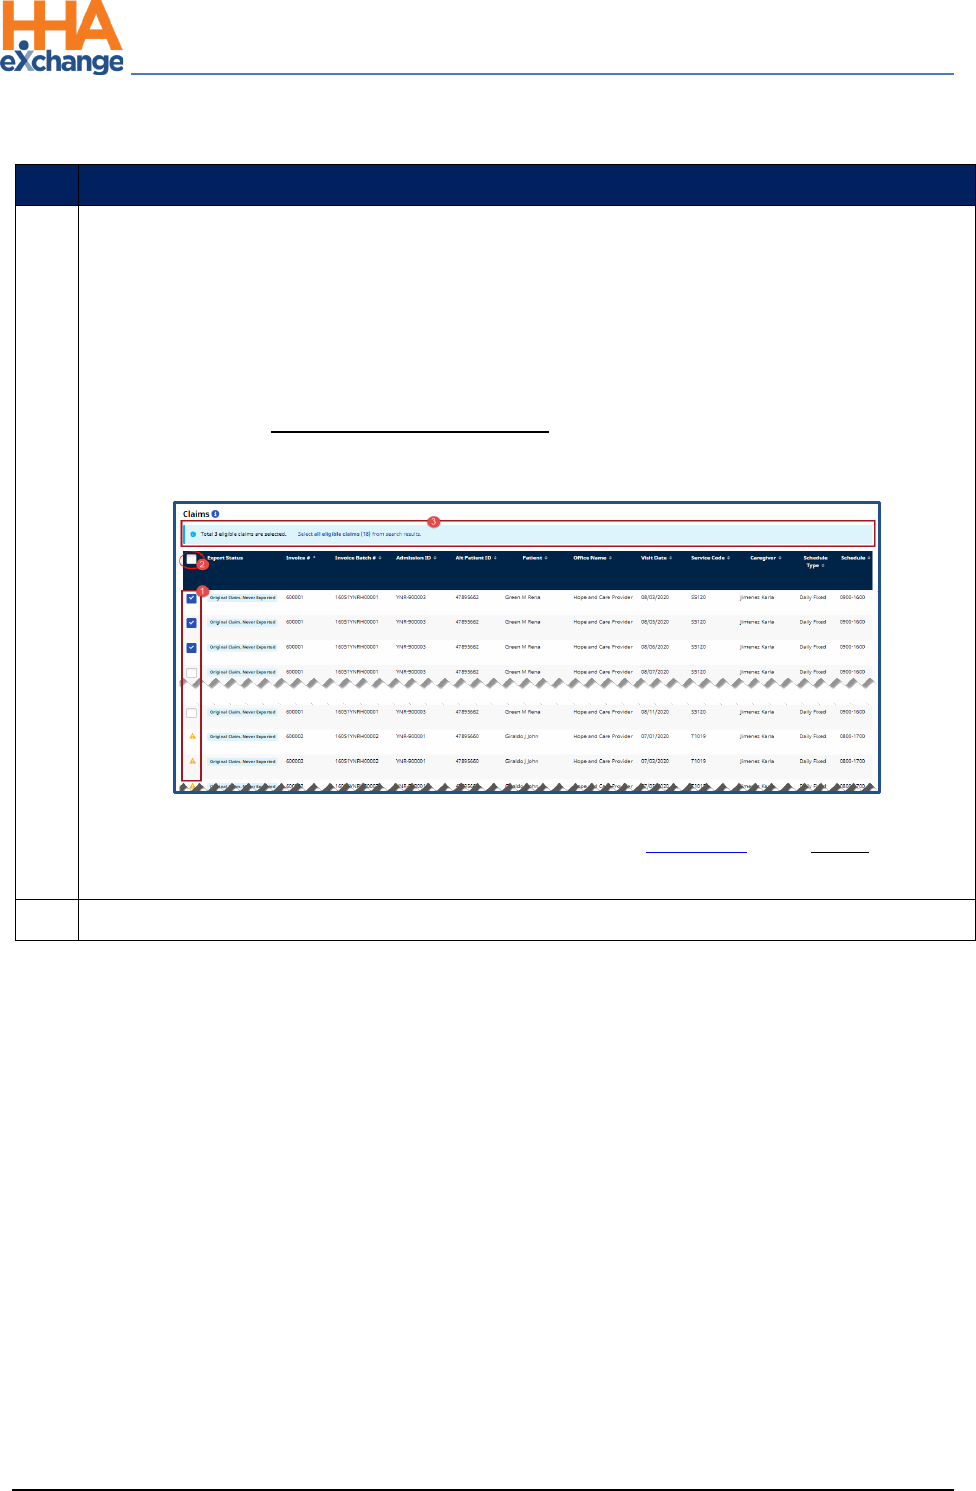
On the Search Results in the Claims section, select the claims to be added. There are 3 selection
options, as follows:
1. Click on a specific row checkbox to select individual claim(s).
2. Select the header checkbox to select all the claims on the current page (only). Note that
selecting this box does not select all claims in the search results.
3. Click on the Select all eligible claims (count) link in the light blue banner to select all
eligible claims in the entire set of search results (across all pages).
Claims Search: Select Claim(s)
Note: Visits with a yellow warning icon (with no active checkbox) are held in Billing Review with an On Hold Status and
must be resolved prior to billing. The Export Status column indicates the hold reason.
6
Once the claims are selected, click on the Add button at the bottom of the page.
The Provider Portal
Billing Process Guide Page | 12 Provider User Guide
Create a New Claims Batch Proprietary & Confidential
Step
Action
7
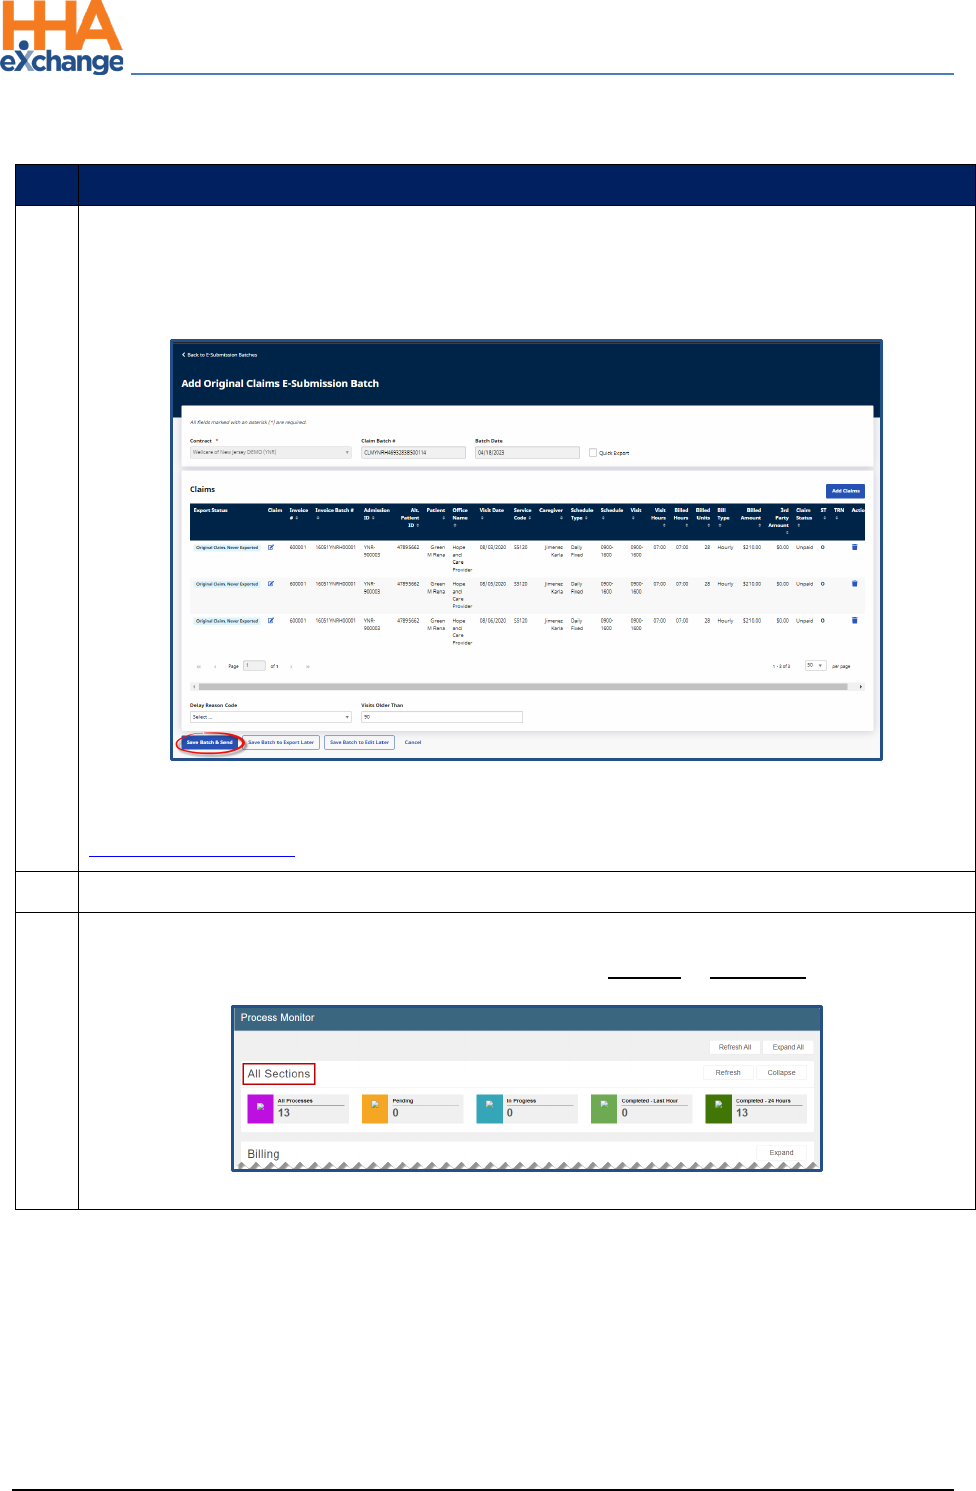
The claims appear on the Add Original Claims E-submission Batch page. Click on the Save Batch &
Send button to send the claims to the SFTP to be picked up by the Payer system via the overnight
process.
Claims E-Submission: Save Batch & Send
Note: Using the Save for Later button only creates the claims batch but does not send to the SFTP. Refer to
Reviewing a Claims Batch for further instructions.
8
The system alerts that the export file is generating. Click Close to continue.
9
(Optional) Navigate to Admin >Process Monitor to view the progress of the submission. Expand
the All Sections category to view. The file can either be in Pending or Completed status.
Process Monitor: All Sections
The Provider Portal
Billing Process Guide Page | 13 Provider User Guide
Reviewing a Claims Batch (Optional) Proprietary & Confidential
Reviewing a Claims Batch (Optional)
The final step (optional) in the billing process is to review the claims batch. Follow the steps below to
review claims batches. If claims are saved but not sent, follow the instructions below to Send the claims
batch.
Step
Action
1
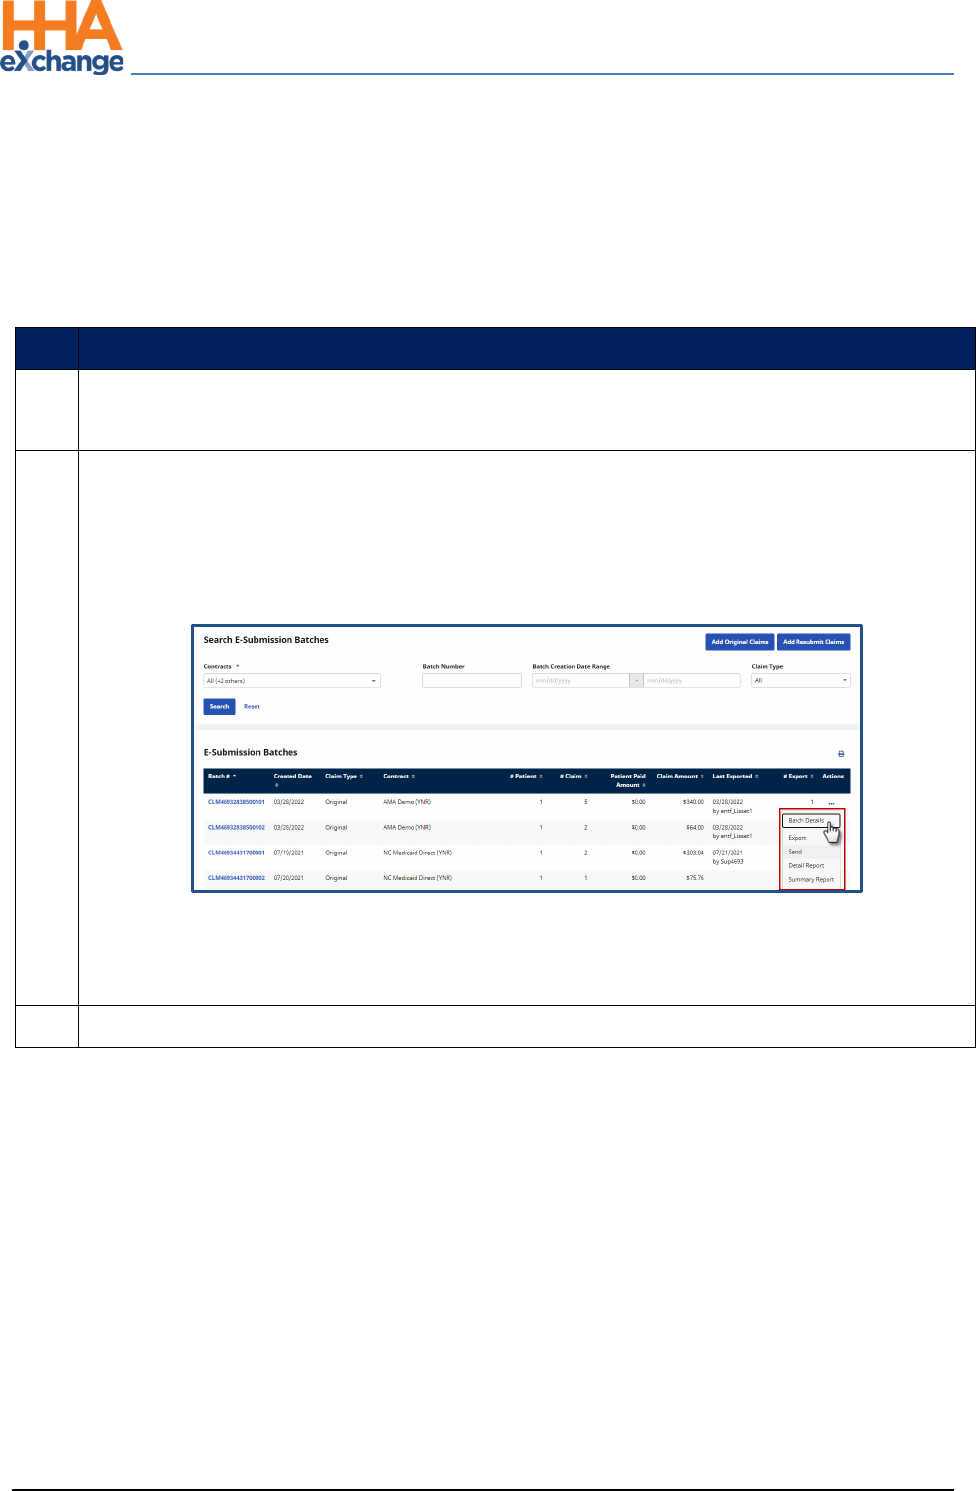
Navigate to the Batch Search window (Billing >Electronic Billing > E-Submission Batches) to
review the claims.
2
On the E-Submission Batches page, select a contract from the Contracts field and click on the
Search button to search for batches. On the Search Results, locate the batch and click on the
ellipsis (…) under the Actions column for a list of menu options to include Batch Details, Export,
Send, Detail Report, and Summary Report (as seen in the following image).
Review a Claims Batch
Note: If the batch has been submitted to the SFTP, then the Send option appears unavailable to select. If the
Send option appears available, then the claim has not been sent.
3
Select the Send option to manually send a claims batch to the SFTP.
The Provider Portal
Billing Process Guide Page | 14 Provider User Guide
Rebilling (Resubmit Claims) Proprietary & Confidential
Rebilling (Resubmit Claims)
Providers can rebill a claim directly in the system to address any claims issues when initially submitting
the claim.
Step
Action
1
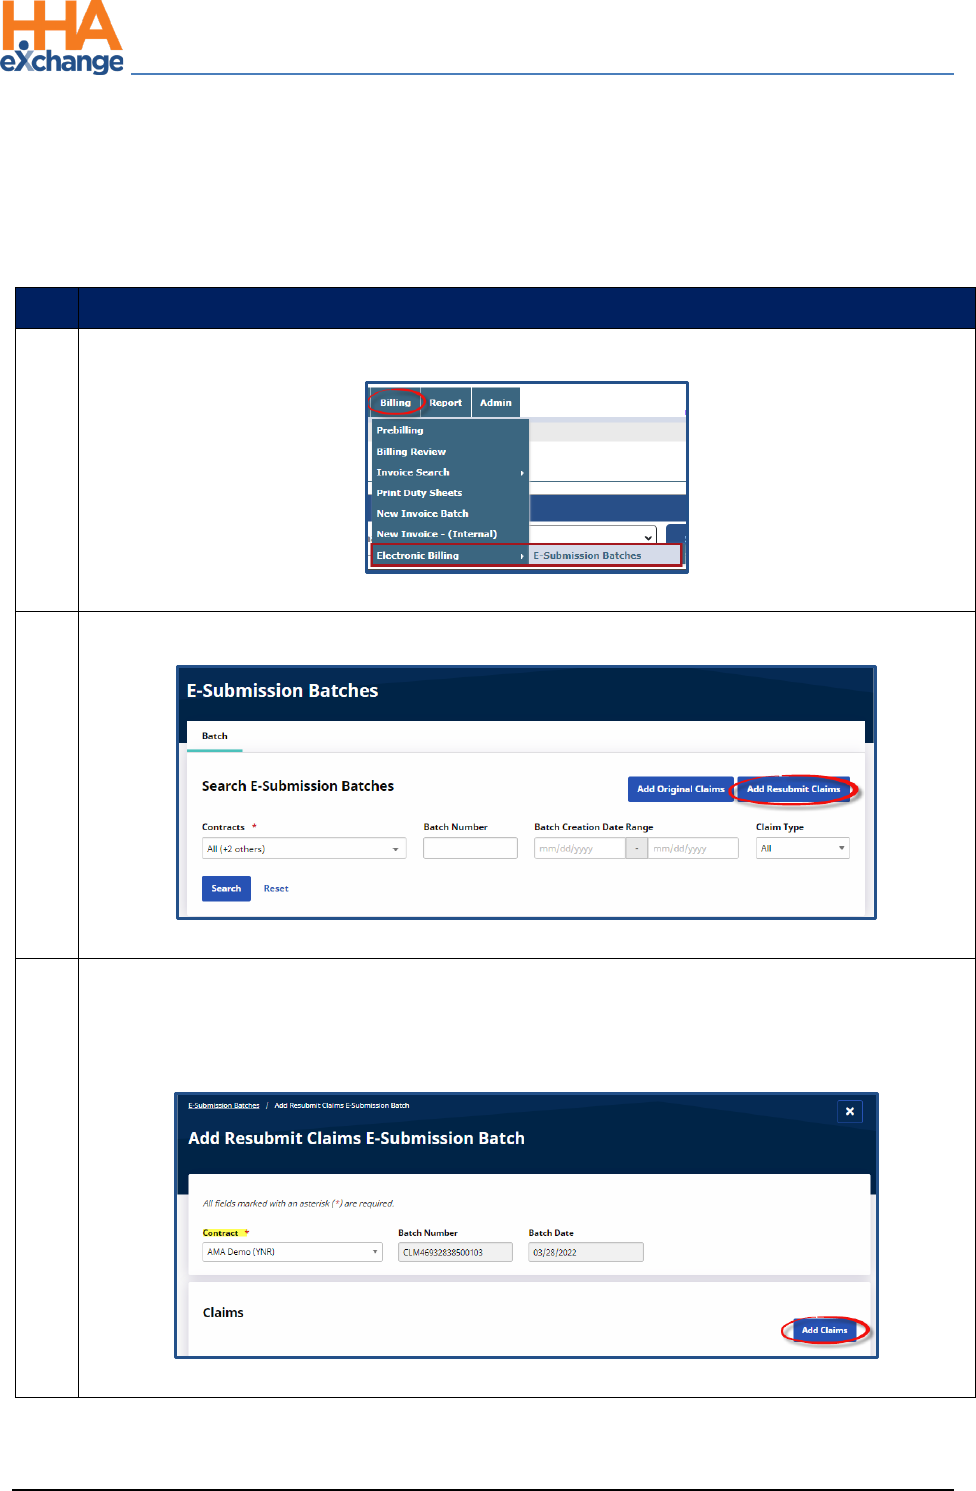
Navigate to Billing > Electronic Billing > E-Submission Batches.
Path to E-Submission Batches
2
On the E-Submission Batches page click on the Add Resubmit Claims button.
Add Resubmit Claims
3
On the Add Resubmit Claims E-submission Batch page, select the Contract. The system
automatically generates a Batch Number and the Batch Date for the claims resubmission. Click
on the Add Claims button.
Add Claims
The Provider Portal
Billing Process Guide Page | 15 Provider User Guide
Rebilling (Resubmit Claims) Proprietary & Confidential
Step
Action
4
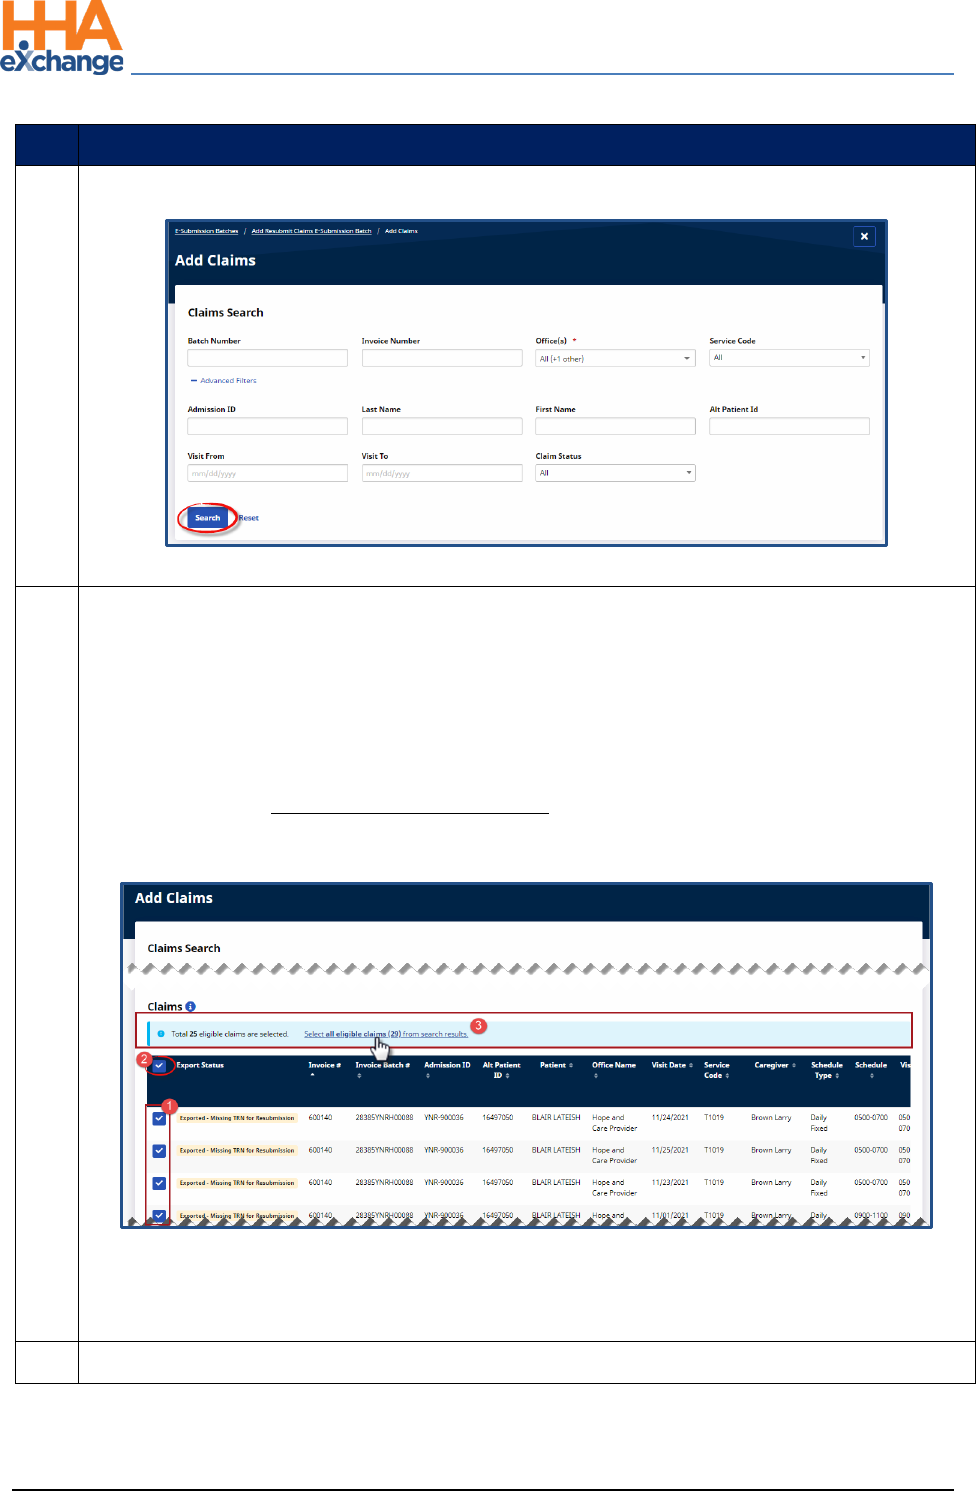
On the Add Claims, Claim Search page, select applicable filter fields and click Search.
Add Claims: Claims Search
5
From the Search Results, select the claims to add to the batch. There are 3 selection options, as
follows:
1. Click on a specific row checkbox to select individual claim(s).
2. Select the header checkbox to select all the claims on the current page (only). Note that
selecting this box does not select all claims in the search results.
3. Click on the Select all eligible claims (count) link in the light blue banner to select all
eligible claims in the entire set of search results (across all pages).
Select Claims
Note: The Export Status column provides a high-level indication of the state of the claim and possible
missing information.
6
Once all desired claims are selected, click on the Add button at the bottoms of the page.
The Provider Portal
Billing Process Guide Page | 16 Provider User Guide
Rebilling (Resubmit Claims) Proprietary & Confidential
Step
Action
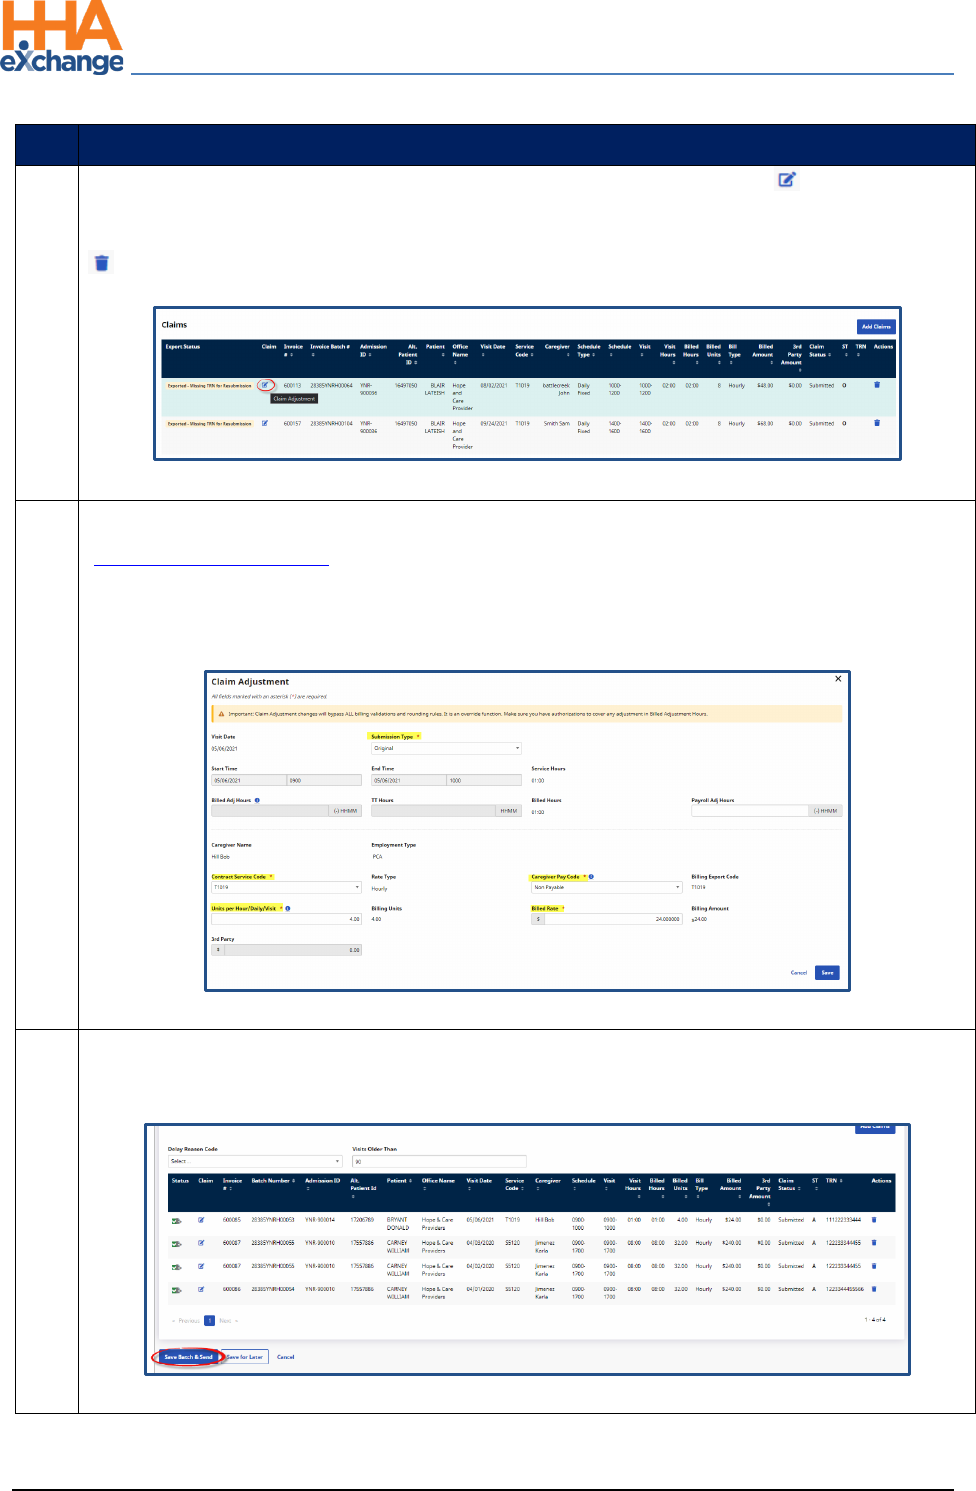
7
On the Add Resubmit Claims E-submission Batch page, click on the edit icon ( ) to open the
Claims Adjustment window. Note: To delete a record from the claim to be resubmitted click on the
icon under the Actions column.
Select Claim to Adjust
8
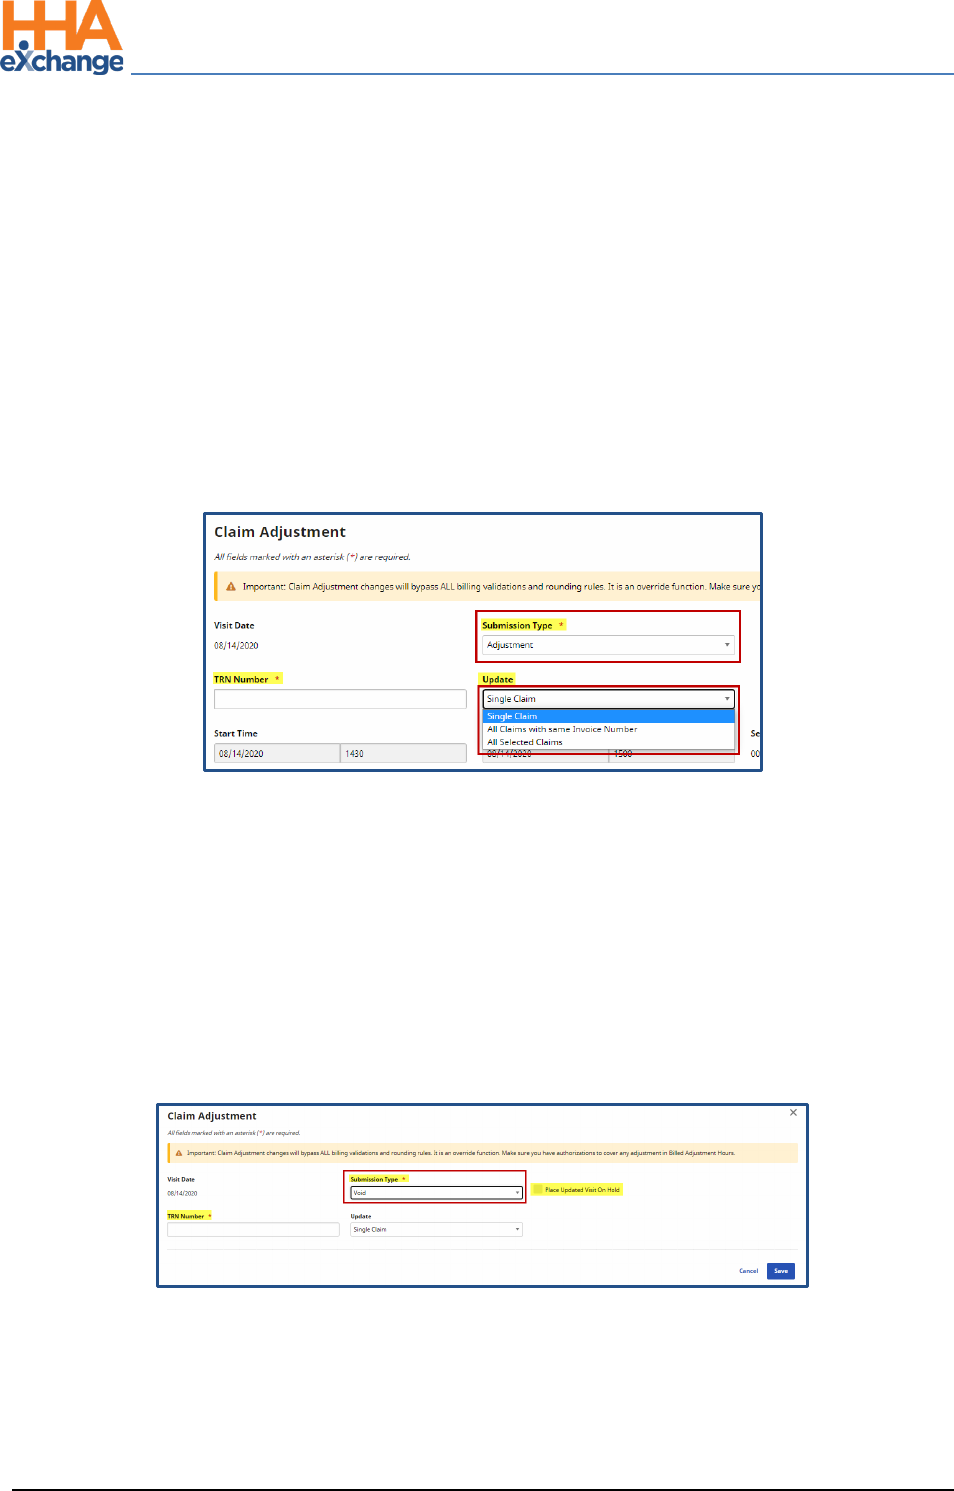
The Claim Adjustment window opens. Select the Submission Type (refer to the
Rebilling Adjustment Type section below for guidance). Correct any applicable fields ensuring
that required fields (denoted with a red asterisk) are completed.
Note: The Billed Adjusted Hours, TT Hours, and 3
rd
Party fields cannot be edited when resubmitting a claim.
Claim Adjustment Window
9
Once saved and ready to resubmit, click on the Save Batch & Send button on the Resubmit Claims
E-submission Batch page.
Resubmit Claim
The Provider Portal
Billing Process Guide Page | 17 Provider User Guide
Rebilling (Resubmit Claims) Proprietary & Confidential
Step
Action
10
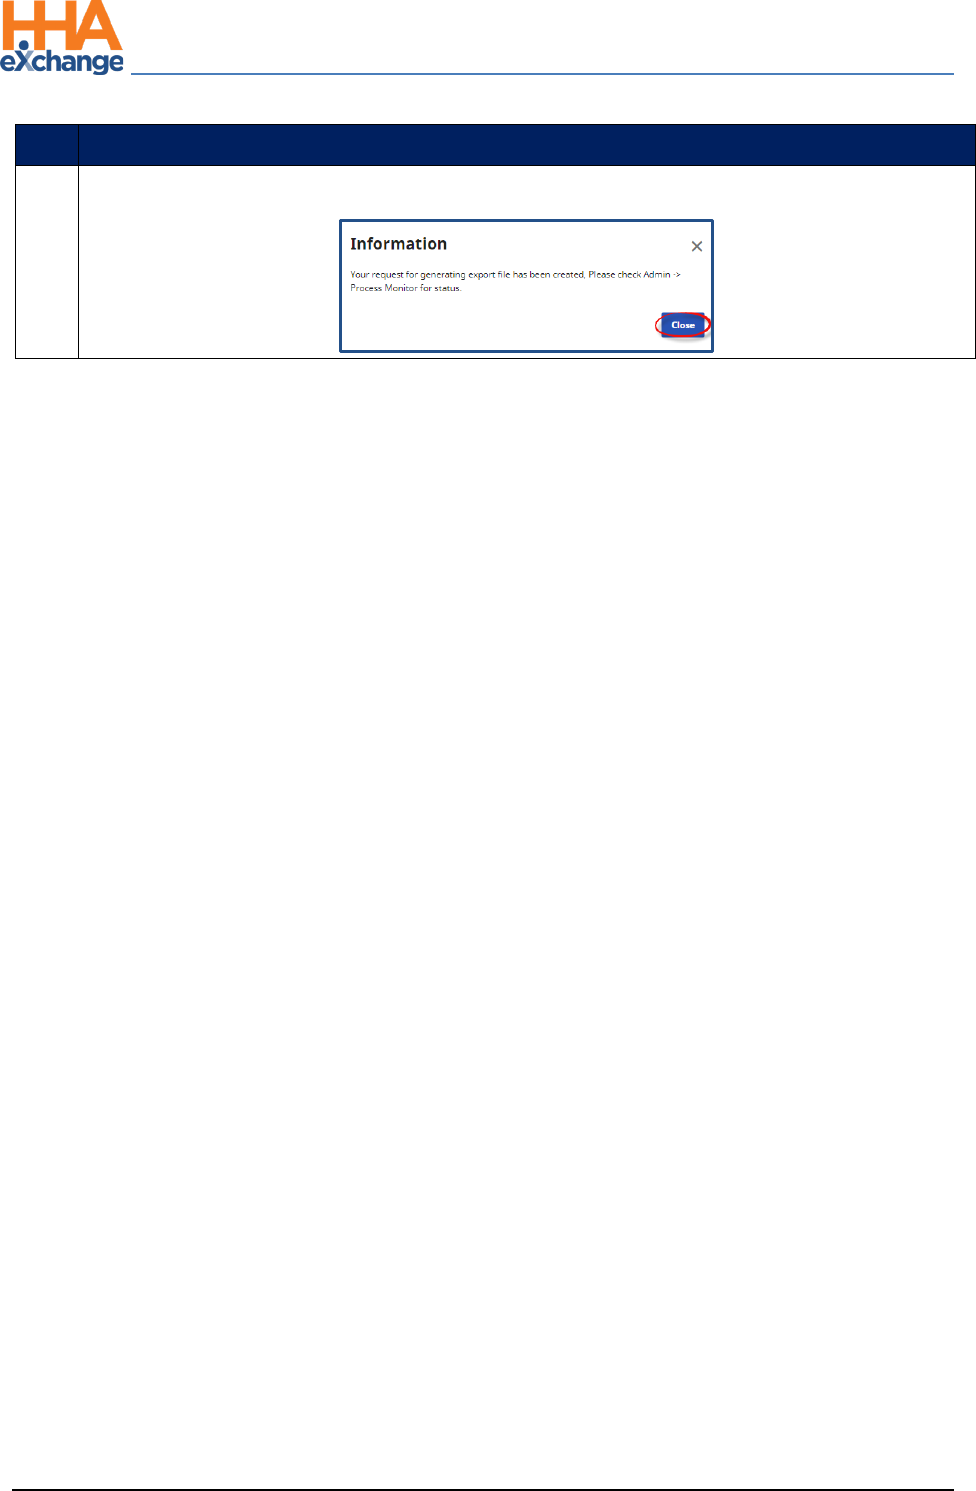
The system alerts that the export file is generating. Click Close to continue.
The Provider Portal
Billing Process Guide Page | 18 Provider User Guide
Rebilling Adjustment Types Proprietary & Confidential
Rebilling Adjustment Types
Original
Original is the default setting used if the Provider does not edit the Submission Type.
Adjustment
The TRN Number* and Update fields are required if Adjustment is selected. For the TRN Number,
indicate if this adjustment is for a Single Claim, All Claims with same Invoice Number, or All Selected
Claims. Refer to the bullets below this table for guidance.
*TRN refers to Transaction Reference Number, unique claim identifier number to be adjusted. The TRN
can also be referred to as the Form Number, Claim ID, or Claim Number. The TRN is also located on the
Electronic Remittance Advice (ERA).
Void
When selecting Void, the TRN Number is required and the Place Updated Visit on Hold checkbox is
automatically selected and un-editable. Select the applicable Update option (Single Claim, All Claims
with same Invoice Number, or All Selected Claims).
Note: Selecting Void hides other adjustment information fields on the window.
Once adjusted, click Save to update the selected record(s). Based on the selected Submission Type,
respective TRN Number, and Update option, the selected records are updated accordingly.

The Provider Portal
Billing Process Guide Page | 19 Provider User Guide
Rebilling Adjustment Types Proprietary & Confidential
• If Single Claim is selected (from the Update field), then only the current record for the selected
Submission Type and TRN Number is updated.
• If the All Claims with same invoice number is selected (from the Update field), then all matching
records with the same Invoice Number are updated according to the chosen Submission Type
and TRN Number.
• If All Selected Claims is selected, then all records are updated with chosen Submission Type and
TRN Number.
The Provider Portal
Billing Process Guide Page | 20 Provider User Guide
Remittances Tab Proprietary & Confidential
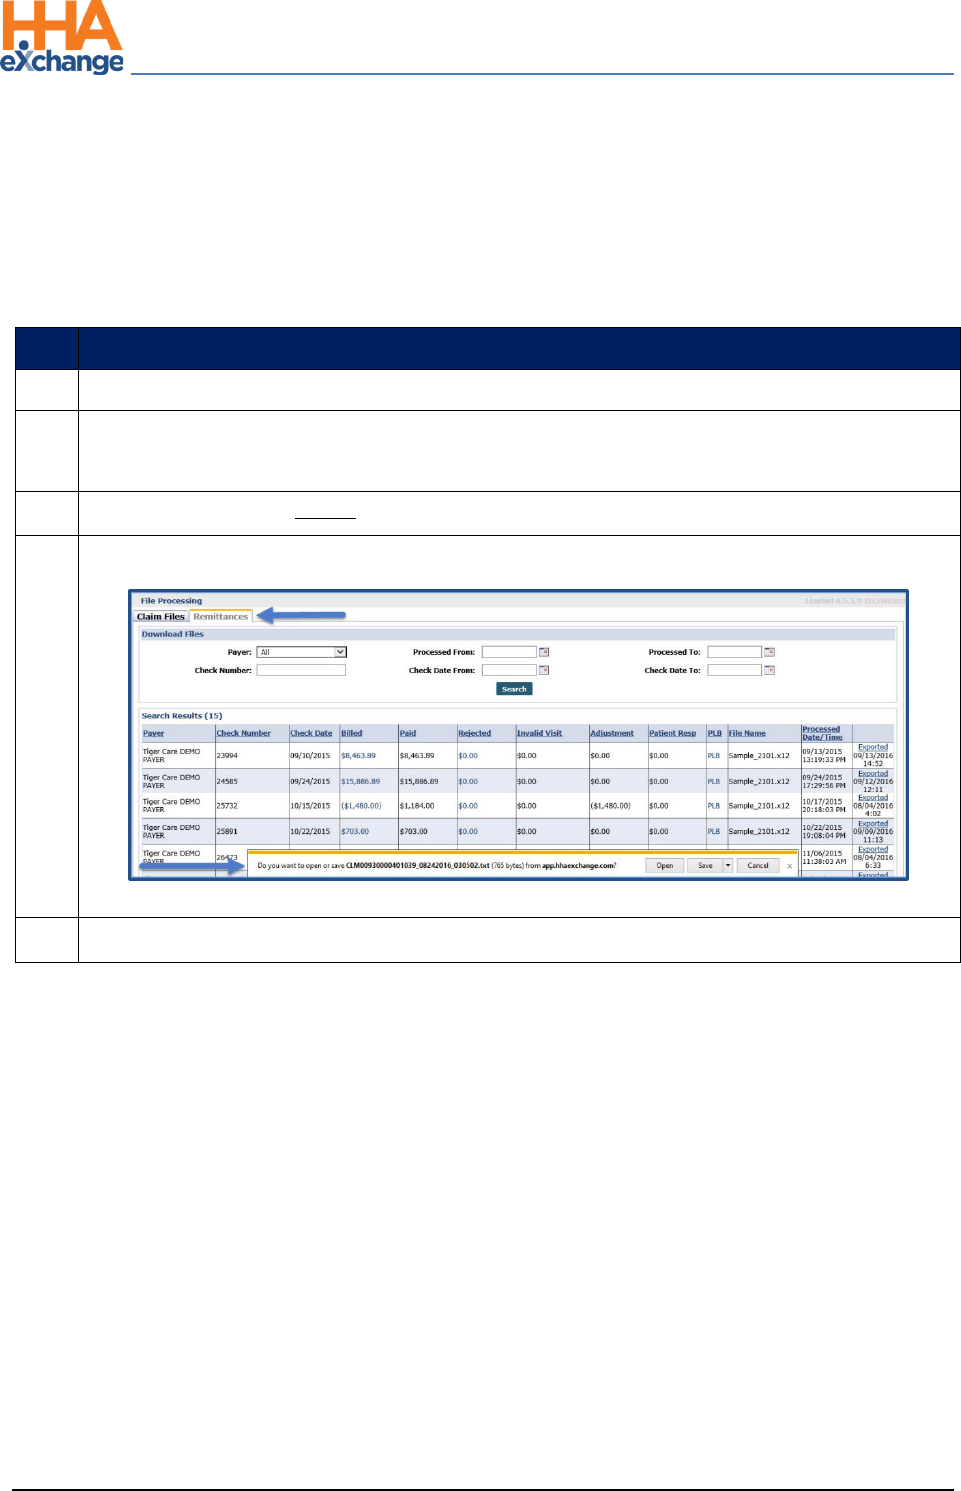
Remittances Tab
The Remittances tab (Admin > File Processing) maintains a record of all 835 Remittance Files that have
been sent back from clearinghouses. The files can be exported from the Remittances tab and processed
in an external application. Complete the following steps to download 835 Remittance Files.
Step
Action
1
Navigate to Admin > File Processing > Remittances
2
Click the Search button to review all remittance files or select search filters to narrow the
search results.
3
In the results, click the Export link in the right most column.
4
A notification appears in-browser, prompting the user to open or save the 835 Remittance File.
Remittances Tab
5
Save the file to the desired location.
